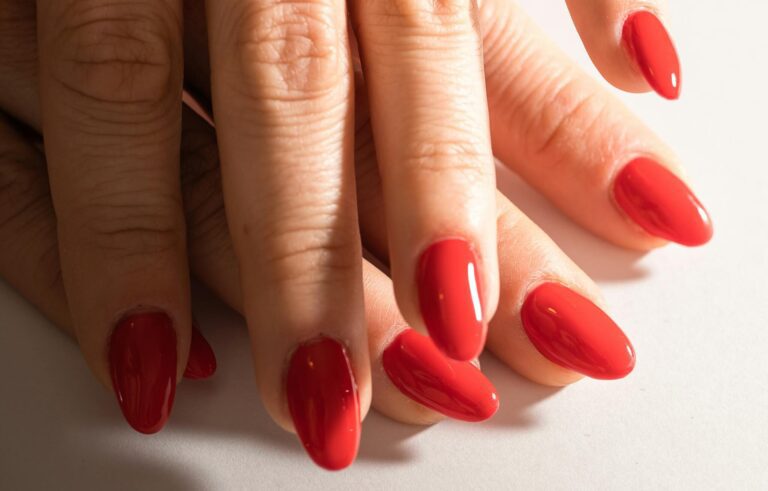
How Long to Soak Gel Nails with Acetone (The Safe & Easy Way to Remove Them)
Gel nail removal is one of those processes where patience is genuinely the skill — not technique, not products, not tools. The number one cause of nail damage after gel removal isn’t acetone, isn’t the removal method, and isn’t the gel itself. It’s forcing the gel off before the acetone has had enough time to fully break down the bond between the gel and the nail plate.
The good news is that when gel removal is done correctly — with the right soak time, the right preparation, and the right technique for what remains after soaking — it causes no meaningful damage to the natural nail. The thinning, peeling, and brittleness that people commonly associate with gel manicures almost always traces back to one specific moment in the removal process where impatience won over patience.
This guide covers exactly how long to soak, why the timing varies, how to tell when the gel is genuinely ready to come off (rather than just guessing at the twenty-minute mark), what to do with the material that remains after soaking, and how to care for the nail afterward so it recovers quickly and completely.
Why Acetone Works — and Why Nothing Else Really Does
Gel polish is chemically distinct from regular nail polish. It’s cured under UV or LED light through a process called photopolymerization, which cross-links the polymer chains in the gel into a rigid, highly resistant network. That cross-linked network is specifically what makes gel chip-resistant and long-lasting — and it’s also what makes it resistant to the solvents in regular nail polish remover.
Acetone works because it’s a stronger solvent that can penetrate the cross-linked gel matrix and disrupt the bonds holding the polymer chains together, causing the gel to soften, swell, and lose adhesion to the nail surface. Lower-concentration acetone products (diluted acetone, non-acetone removers) may eventually soften gel given enough time, but the practical soak time extends to an hour or more, which causes far more dehydration to the surrounding skin and nail plate than a proper twenty-minute pure acetone soak does. Pure acetone is both faster and, somewhat counterintuitively, less damaging when used correctly than extended exposure to diluted alternatives.
The gel doesn’t dissolve in acetone — it softens and loses its bond to the nail, allowing it to be pushed off gently. This distinction matters: acetone-softened gel should lift away from the nail plate easily when pushed with a wooden stick. If significant pressure is required, the gel isn’t ready, and more soak time is needed.
How Long Should You Soak Gel Nails?
The baseline answer is fifteen to twenty minutes for standard gel polish applied over natural nails with a standard gel base coat.
That baseline shifts in specific directions based on a few variables:
Thicker applications take longer. Gel that was applied in multiple layers, or gel that was built up for additional coverage or wear extension between appointments, has more total material for the acetone to penetrate. Add five to ten minutes beyond the standard baseline for visibly thick applications.
Gel extensions and overlays take significantly longer. Gel applied over sculpted forms to create length — builder gel, polygel, or hard gel extension applications — has a different chemical composition than standard gel polish and requires thirty to forty-five minutes of soak time before it begins to loosen. Some hard gel products are specifically soak-off resistant and require filing down rather than soaking — if your gel doesn’t respond to thirty minutes of soaking, this is likely what you’re dealing with.
Older gel (three weeks or more of wear) may take less time. Gel that has been on the nail for longer has already experienced some degradation from UV exposure, daily use, and the natural oxidation process. This slightly degraded state means the acetone penetrates more quickly — some women find that a manicure close to the removal point of its wear cycle comes off in ten to twelve minutes.
Temperature affects soak time. Warm acetone penetrates faster than cold acetone. If your bathroom or working environment is cold, the acetone will work more slowly. This is one of the practical arguments for the bowl-in-warm-water heating method — a gently warmed acetone solution can reduce soak time by several minutes.
Step-by-Step Removal Process
Step 1: File the Topcoat Surface
Before any acetone contact, lightly file the surface of the gel to remove the shiny, sealed topcoat layer. The topcoat is the most acetone-resistant layer of the gel application — it’s formulated to be durable and resistant to environmental exposure, which means it’s also resistant to acetone penetration. Removing it with a file before soaking allows the acetone to reach the color coat and base coat directly, which meaningfully reduces soak time.
Use a medium-grit file (150 to 180 grit) and file with light pressure across the surface — the goal is removing the shine without removing the color coat beneath it. You’re buffing, not filing down through the gel. When the entire nail surface is uniformly matte rather than shiny, you’ve removed enough topcoat.
Do not file down to the natural nail. The surface should still look colored and coated — just no longer glossy.
Step 2: Protect the Surrounding Skin
Pure acetone is a strong dehydrant, and the skin around the nails — the cuticles, the sidewalls, the fingertips — will absorb some of it during soaking. Applying a thin layer of cuticle oil, petroleum jelly, or a thick hand cream around (not on) the nail surface before soaking creates a protective barrier that significantly reduces the drying effect on the skin without blocking the acetone’s access to the gel itself.
Apply this specifically to the cuticle area, the sidewalls beside the nail, and the fingertips. Avoid getting it on the nail plate surface — any oil on the gel surface will slow acetone penetration.
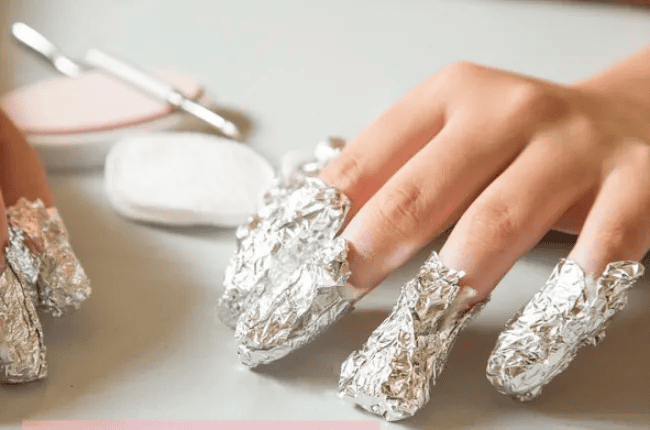
Step 3: Soak Cotton and Wrap With Foil
Cut pure acetone-soaked cotton into pieces sized to cover each nail surface, then press firmly against the nail and secure by wrapping the finger tightly with a small piece of aluminum foil. The foil serves two purposes: it holds the cotton in firm, continuous contact with the nail surface (better contact means more consistent acetone delivery), and it creates a slightly warmer microenvironment from body heat that slightly accelerates the softening process.
Pure acetone specifically — the ingredient label should show acetone as the only or primary active ingredient, or at a minimum above 95% concentration. Products labeled “nail polish remover” are typically diluted to 60–70% acetone or lower and will require significantly extended soak times for gel removal.
The wrapping technique matters: the foil should be snug enough to hold the cotton in contact with the nail without gaps, but not so tight that it cuts off circulation. Secure at the tip and fold the foil over the top of the finger.
Step 4: Wait — and Resist Checking Early
Set a timer for fifteen minutes and genuinely wait without checking. The impulse to unwrap a nail at eight or ten minutes to see how it’s going disrupts the process — every time you unwrap a nail, you release the warm acetone environment the foil was maintaining, which slows the remaining penetration.
After fifteen minutes, unwrap one nail (ideally a thumbnail or pinky where you can check without committing to the others) and test with a wooden cuticle pusher. Push very gently from the cuticle toward the free edge — if the gel slides off easily with almost no pressure, it’s ready. If you encounter any resistance, re-wrap immediately and wait another five minutes before checking again.
Never test by trying to lift the edge of the gel with your fingernail or a metal tool. The wooden pusher test is specifically about assessing whether the gel slides off passively, not about forcing it.
Step 5: Remove the Gel With Gentle Pushing Only
When the gel is ready, unwrap each finger one at a time and immediately use the wooden cuticle pusher to push the gel from the cuticle area toward the free edge in slow, gentle strokes. The gel should move ahead of the pusher like softened putty — any resistance means that section needs more time.
Work from the base toward the tip rather than trying to lift from the edges. Lifting from the edge tends to pull the gel rather than push it, and pulling applies stress to the nail plate. Pushing from the base uses the direction of natural adhesion (least adhesion at the cuticle area after soaking) to work progressively across the nail.
Stubborn spots — usually at the free edge where the gel was thickest, or near the sidewalls where it was sealed most completely — should be re-wrapped with fresh acetone-soaked cotton for three to five additional minutes rather than being scraped, pried, or forced. The time investment of an additional few minutes is always less damaging than the force required to remove gel that isn’t ready.
Step 6: Address Any Remaining Residue
After removing the bulk of the gel, some thin residue — the bottom of the base coat layer — often remains. This will appear as a very thin, slightly textured film rather than a solid gel layer. It’s important not to confuse this residue with a layer of gel that needs more soaking — at this point, it’s simply a very thin coating that responds to light buffing rather than additional acetone.
Use a fine-grit buffer (220 grit or higher) with extremely light pressure to smooth the nail surface. The goal is removing the residue without thinning the natural nail plate beneath it. If significant pressure is required, the residue is still too thick to buff and a brief additional soak of two to three minutes will bring it to a buffable state.
Step 7: Rehydrate Thoroughly
Acetone removes both the gel and significant moisture from the nail plate and surrounding skin. The post-removal rehydration step is not optional — it directly affects both how the nail feels immediately after removal and how quickly it recovers its natural flexibility and strength.
Apply a generous amount of cuticle oil to each nail and the surrounding skin immediately after removal, before washing hands. Massage it in. Then wash hands gently, apply a nourishing hand cream, and reapply cuticle oil once more. If you’re planning to apply a new manicure the same day, wait at least thirty minutes after removal and moisturizing before beginning — acetone-dehydrated nails don’t provide the same adhesion surface as fully rehydrated ones.
Alternative Removal Methods
Acetone bowl soak: Rather than wrapping individual fingers, submerge all fingernails in a small bowl of pure acetone. This method works but has two disadvantages: the acetone is exposed to air, which causes it to evaporate and lose concentration during the soak (reducing effectiveness over time), and the skin surrounding the nails is exposed to continuous acetone contact without the protection that foil-and-cotton wrapping provides. If you use this method, keep the bowl covered between checks and apply extra skin protection beforehand.
Electric nail soak caps: Small silicone or felt-lined caps with built-in acetone reservoirs are available as reusable alternatives to foil-and-cotton. They work on the same principle — holding acetone-soaked material in contact with the nail in a contained environment — and some women find them significantly more convenient, especially for doing both hands simultaneously. Soak times are comparable to the foil method.
Professional removal: If you consistently have difficulty removing gel at home without damage, or if you’re dealing with hard gel or gel extensions that don’t respond to standard soaking, professional removal is the most reliable option. A technician can more accurately assess when the gel is genuinely ready to be pushed off versus when it needs additional soak time, and can address any stubborn areas with the right tools and technique.
Common Mistakes That Cause Nail Damage
Peeling or lifting the gel before soaking: The most damaging possible approach. Peeling gel removes the gel bonded layers of the natural nail plate along with it, causing the thinning and peeling that many women incorrectly attribute to the gel product rather than the removal method.
Checking too early and applying force: The second most damaging approach. Gel that has been soaking for seven or eight minutes has softened somewhat but not fully — pushing it off at that stage requires significant force that damages the nail plate.
Using a metal tool rather than a wooden pusher: Metal cuticle tools have sharp edges and can gouge the nail plate surface when used for gel removal. Wooden sticks (orange sticks or birchwood cuticle pushers) have no sharp edge and can’t gouge even under significant pressure.
Skipping the topcoat filing step: The topcoat is the most resistant layer to acetone penetration. Skipping the filing step can add five to ten minutes to the necessary soak time, during which the surrounding skin absorbs more acetone than it would with a proper topcoat removal first.
Using diluted acetone: A fifteen-minute soak in 60% acetone produces incomplete softening of the gel. The soak time required to achieve the same result as pure acetone can extend to thirty or forty minutes, during which the skin is exposed to the drying effects for far longer than necessary.
Filing aggressively after removal: The nail plate after gel removal is temporarily more porous and more susceptible to thinning from mechanical abrasion. Light buffing to remove residue is appropriate; any filing pressure that you’d consider vigorous is too much.
Final Thoughts
Gel nail removal done correctly is genuinely undramatic — fifteen to twenty minutes of patience, gentle pushing when the gel is ready, light buffing, and thorough rehydration afterward. The process that causes damage is a compressed, impatient version of the same process: not enough soak time, too much pressure, too much buffing to compensate for gel that wasn’t ready.
The consistent lesson across every step is the same: give the process the time it needs at each stage, use less force than feels necessary, and invest the two minutes of post-removal rehydration that keeps the nail plate healthy between manicures. Those three habits, practiced consistently, are the difference between gel that leaves your nails in excellent condition and gel that leaves them thin and brittle.
What’s the difference between pure acetone and acetone nail polish remover?
Pure acetone is a single-ingredient solvent at or near 100% concentration. Acetone nail polish remover is a diluted product, typically containing 50–70% acetone along with water, moisturizing agents, and fragrance — the dilution makes it gentler on the skin but significantly less effective for gel removal, requiring two to three times the soak duration for comparable results. For gel removal specifically, pure acetone used for the correct duration with proper skin protection is more efficient and ultimately less dehydrating than extended exposure to diluted versions.
Will the acetone soak damage my natural nails?
A correctly timed and executed acetone soak — fifteen to twenty minutes for standard gel polish — doesn’t cause permanent nail damage. Acetone temporarily dehydrates the nail plate, which makes it feel softer, more flexible, and sometimes slightly chalky immediately after removal. These effects reverse within twenty-four to forty-eight hours with normal cuticle oil and hand cream application. The permanent thinning and brittleness that some women experience after regular gel use is almost always the result of forced removal, over-buffing during removal, or very frequent application-and-removal cycles without recovery time between.
Can I soak off gel extensions the same way as gel polish?
Standard soft gel nail polish (applied in thin color coat layers over a gel base coat) soaks off as described in this guide. Gel extensions — builder gel, polygel, and hard gel applied in thick layers to create length — require longer soak times (thirty to forty-five minutes) and may still require some filing after soaking. Hard gel specifically is often not soak-off removable and needs to be filed down to the natural nail — if your gel doesn’t begin to soften after thirty minutes of pure acetone soaking, filing is the appropriate next step rather than continuing to soak.
How often can I safely remove and reapply gel?
The limiting factor for frequent gel use isn’t the gel itself but the cumulative effect of the removal process on the nail plate. Most nail professionals suggest giving the natural nail a brief break — even one week without any product — every three to four gel application cycles. During this break period, applying a nourishing base coat or strengthening treatment and consistent daily cuticle oil gives the nail plate time to restore its natural hydration and flexibility before the next application.
What should I do if my nail feels sore or looks white after removal?
Soreness immediately after gel removal is uncommon with a properly executed soak-off removal but can occasionally occur if the nail plate was over-buffed or if the gel was partially forced rather than fully soaked. A white, chalky appearance of the nail surface is normal and temporary — it’s the result of acetone dehydration and resolves within one to two days with cuticle oil application. Persistent soreness, a nail plate that looks greenish or brownish, or a nail that has visibly separated from the nail bed are signs of potential nail damage or infection that warrant assessment by a professional before a new application is started.