How to Remove Dip Powder Nails at Home Without Damaging Your Natural Nails
Dip powder nails are one of the most durable manicure formats available — which is exactly what makes removing them require more care and patience than a regular polish change. The bonding resin that creates the dip’s strength also bonds firmly to the natural nail surface, meaning the wrong removal approach can take layers of your natural nail with it. Peeling, prying, or forcing dip powder off is the single fastest route to thin, weakened, damaged nails that take months to recover.
The good news is that safe, complete dip removal at home is genuinely straightforward when you follow the right method. It requires patience more than skill, and the results — a clean removal with natural nails intact — are entirely achievable without a salon visit.
Why Dip Powder Requires Specific Removal
Understanding the construction of a dip manicure helps clarify why it needs specific removal treatment. The process layers a bonding resin with colored powder, building up multiple layers of a structure that’s significantly thicker and more chemically bonded to the nail than regular polish. The resin specifically creates adhesion to the nail surface that resists the normal removal methods that work for regular polish or even gel.
Breaking down that bond requires acetone — and specifically 100% acetone rather than diluted nail polish remover, which doesn’t have the concentration to effectively dissolve dip resin within a reasonable time. The removal process is fundamentally a waiting game: giving the acetone sufficient contact time with the dip to fully dissolve the resin before attempting to remove anything.
What You’ll Need
Gathering everything before you start prevents interruptions during the process.
100% pure acetone, cotton balls or pads, aluminum foil or reusable nail soak-off clips, a nail file or buffer, a cuticle stick or orange stick, cuticle oil, hand moisturizer, and optionally petroleum jelly for skin protection. Having these ready before you begin makes the process significantly more manageable.
Method 1: The Foil Soak-Off Method
This is the most consistently effective at-home dip removal approach and the one that gives you the most control over the process.
Step 1: File away the top layer. Use a nail file to gently buff the shiny surface coat of the dip manicure. This is the most important preparatory step — the sealed top coat creates a barrier that significantly slows acetone penetration. You don’t need to file down into the color, just remove the shine. This step alone can cut your soaking time considerably.
Step 2: Prepare the acetone-soaked cotton. Cut cotton balls into pieces small enough to cover each nail without much excess. Saturate each piece thoroughly with 100% acetone.
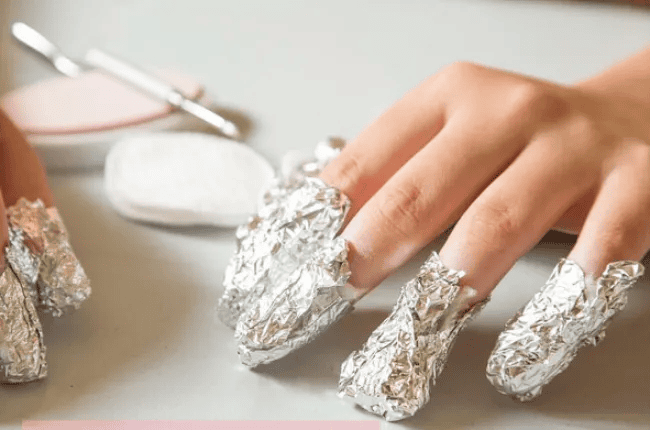
Step 3: Wrap each nail. Place a soaked cotton piece directly on each nail, then wrap firmly with a small square of aluminum foil. The foil should be tight enough to hold the cotton against the nail surface but not so tight it’s uncomfortable. Reusable silicone soak-off clips achieve the same result with less waste and are worth the investment if you remove dip powder regularly.
Step 4: Wait. This is the step that requires the most patience and is also the step most often rushed, leading to incomplete removal and the temptation to pry. Wait fifteen to twenty minutes as the minimum for a standard dip manicure. If your dip application was particularly thick or has multiple layers, thirty minutes may be needed.
Step 5: Check and remove. Unwrap one nail to check progress. If the dip is lifting and sliding off easily with gentle pressure from a cuticle stick, the soak is complete. If it’s resisting at all, rewrap that nail and give it another five to ten minutes. Gently push the softened dip toward the tip of the nail — it should slide off in soft pieces rather than requiring any force. Never scrape aggressively.
Repeat until all nails are clean, then move immediately to aftercare.
Method 2: The Bowl Soak Method
If foil wrapping feels too fiddly or you prefer a hands-off approach, soaking directly in a bowl of acetone produces the same chemical result with less preparation.
Pour enough 100% acetone into a glass or ceramic bowl to submerge your fingertips — avoid plastic bowls, which acetone can damage. Apply petroleum jelly generously around each nail and along the cuticle area before soaking to protect the skin from dryness. Submerge your fingertips and soak for fifteen to twenty minutes.
The limitation of this method is that the acetone fumes are more concentrated and more irritating than with the foil method, and it’s more difficult to do one hand at a time. Working in a well-ventilated space is essential, and this method is less practical for those with sensitivity to acetone fumes.
Method 3: Professional Removal
If you want to skip acetone exposure entirely or simply prefer the speed of a professional appointment, a nail technician can remove dip powder using an electric file to mechanically break down the layers alongside the acetone soak. This is genuinely faster than at-home removal and can be the right choice if your natural nails are already compromised or if you’re uncertain about the DIY process. At-home removal done correctly produces equivalent results — the main advantage of professional removal is speed and the nail technician’s ability to assess nail condition throughout.
Common Mistakes That Damage Natural Nails
Peeling or prying the dip off. This is the single most damaging thing you can do during removal. When dip resin is bonded to the nail and removed forcibly, it takes the top layers of the natural nail plate with it, causing thinning, weakness, and sometimes painful sensitivity that takes weeks to months to recover from. If the dip isn’t releasing easily, the acetone hasn’t done enough work yet. Re-soak, don’t force.
Skipping the filing step. The top coat seals the dip against acetone penetration. Without filing it away first, acetone takes dramatically longer to work — sometimes more than twice as long — and you’re more likely to get impatient and resort to forcing the dip.
Using regular nail polish remover instead of pure acetone. Polish remover formulas typically contain conditioners and diluting agents that reduce acetone concentration. Only 100% acetone has the strength to break down dip resin in a practical timeframe. Using regular remover often results in insufficient dissolution followed by the temptation to peel.
Removing dip too aggressively even when it’s partially dissolved. Partially dissolved dip is still partially bonded. Even if the acetone has worked through most of the layers, forcing removal of the remaining bonded sections still causes nail damage. Patience at every stage is the most important tool in this process.
Nail Aftercare After Dip Removal
Acetone is effective and safe for occasional use but does dehydrate both the nail plate and the surrounding skin. Immediate and consistent aftercare makes a meaningful difference to nail health following removal.
Buff lightly. Use a fine buffer to smooth any remaining surface texture on the natural nail. Don’t over-buff — just enough to create a clean, even surface.
Apply cuticle oil immediately. Massage cuticle oil into each nail bed and the surrounding skin directly after removal. This begins the rehydration process immediately when the nail’s capacity to absorb moisture is highest. Daily cuticle oil application for at least a week following removal supports recovery significantly.
Moisturize hands thoroughly. Acetone strips oil from the skin as thoroughly as it does from the nail. Apply a rich hand cream immediately after removal and repeat throughout the following day.
Use a strengthening base coat. If you’re reapplying any nail product, starting with a strengthening or fortifying base coat gives recovering nails additional support during the growth cycle.
Take breaks between dip applications. Allowing natural nails at least one to two weeks of recovery between dip manicures maintains their long-term strength and integrity. Continuous back-to-back dip applications without recovery periods can gradually thin and weaken the nail plate over time.
Final Thoughts
Removing dip powder nails safely at home comes down to one core principle: let the acetone do the work. File the top coat, soak thoroughly, wait patiently, and only remove the dip when it releases easily. That sequence, followed by immediate and consistent aftercare, produces a clean removal that leaves natural nails healthy and ready for whatever comes next.
The foil method is the most controlled and most recommended approach. The bowl method works equally well for those who find foil preparation easier to skip. Both require the same patience and the same resistance to the instinct to peel or force.
Your natural nails are worth the extra twenty minutes.
How do I know when the dip is ready to be removed?
The dip should slide off with gentle pressure from a cuticle stick, moving toward the nail tip with minimal resistance. If you’re pushing firmly and the dip isn’t moving, it needs more soaking time. The right moment feels like the dip is almost releasing itself — any significant force means it’s not ready.
Can I speed up the process?
The most effective way to reduce soaking time is to file the top coat off thoroughly before soaking. Beyond that, ensuring the foil or soak-off clips are making consistent contact with the nail surface — no air gaps between the cotton and the nail — maximizes acetone efficiency. Warming the acetone slightly by placing the bowl in a larger bowl of warm water can also accelerate penetration, though be careful not to overheat it.
Will my nails be damaged after dip removal?
Done correctly with patience and no forcing, dip removal should leave natural nails intact. Some temporary dehydration and surface dullness is normal and resolved by aftercare. If you see thinning, peeling layers, or significant weakness after removal, it suggests either previous mechanical damage from peeling or that the dip application itself was particularly thick and required more aggressive acetone exposure. Consistent aftercare addresses the dehydration component.
How often can I safely get dip nails?
Most nail health guidelines suggest allowing at least one to two weeks between dip applications for nails to recover and rehydrate. Some people wear dip continuously with proper aftercare and maintain healthy nails; others find more recovery time beneficial. Monitoring your natural nail thickness and strength between applications is the most reliable guide to what your specific nails need.