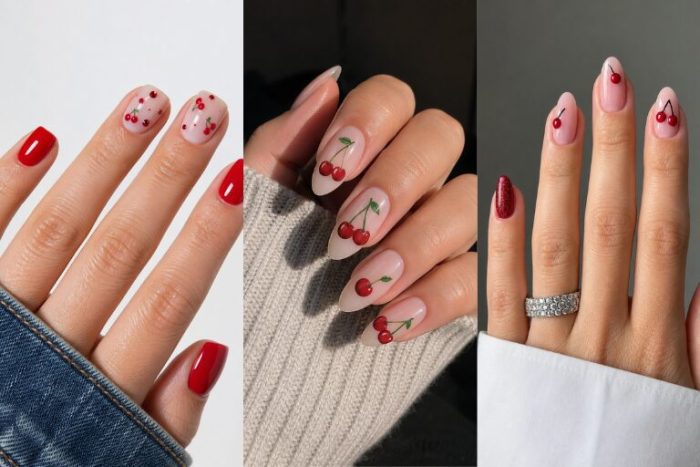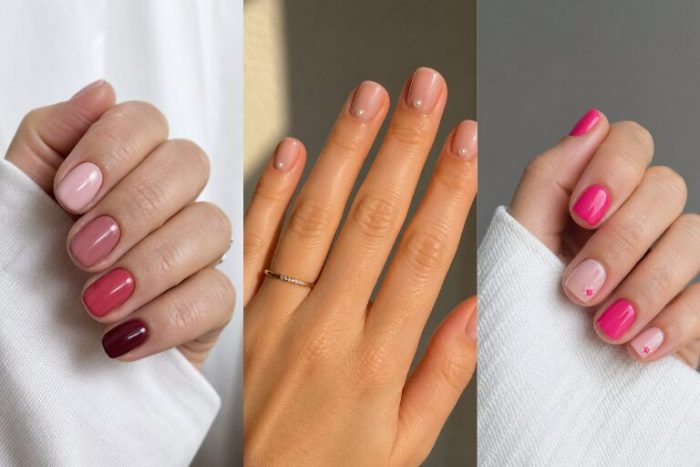
30 Gorgeous Burgundy Nail Ideas That Work for Every Season and Occasion
Burgundy is the nail color that never needs an occasion to justify itself. It’s rich enough to feel special without being so dramatic that it demands a specific outfit or event. It works in every season — not just fall, despite its obvious autumn resonance — and flatters a wider range of skin tones than almost any other nail color in the deep spectrum. It reads as sophisticated on short nails and luxurious on long ones. It looks polished with a glossy finish and intentionally editorial with a matte one.
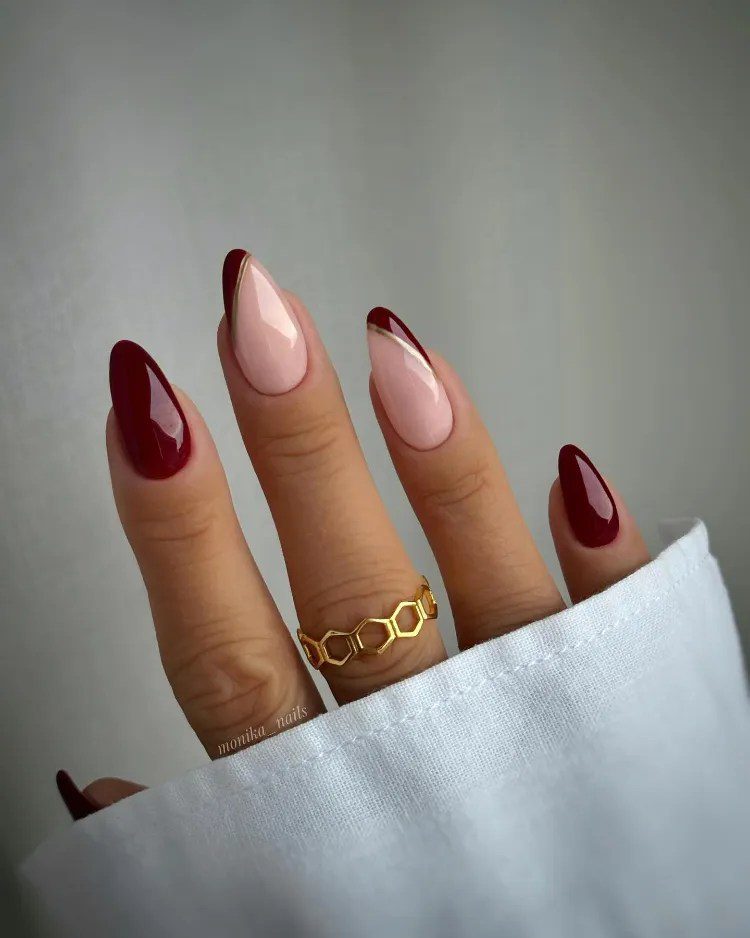
The specific appeal of burgundy nails comes down to tonal positioning: it sits at the intersection of red’s confidence and purple’s depth, which gives it a complexity that single-note colors lack. It’s not trying to be bold. It just is.
These 30 burgundy nail designs cover the full range of the color’s expressive potential — from the most minimalist solid coffin to the most elaborate 3D floral embellishment, from the softest nude-and-burgundy pairing to the most dramatically saturated statement. Every design comes with specific guidance on how to recreate it and what occasions it suits best, so you can make the most informed and inspired choice for your next appointment.
What Makes Burgundy the Most Versatile Nail Color
Before the designs, a few reasons why burgundy specifically outperforms other dark polish colors across the widest range of circumstances.
It flatters every skin tone differently but consistently. On fair skin, burgundy creates a striking contrast that makes the color look vivid and intentional. On medium skin, it harmonizes with warm and cool undertones alike, reading as naturally complementary rather than deliberately chosen. On deep skin, burgundy creates a rich, jewel-toned effect where the depth of the color and the depth of the skin enhance each other rather than competing.
It works in every season with minimal adjustment. Most nail colors have seasonal alignment — pastels for spring, neons for summer, dark greens for autumn, whites for winter. Burgundy crosses all of those boundaries: it suits autumn most naturally but feels equally appropriate in winter, surprisingly fresh in spring when paired with nude or blush accents, and sophisticated in summer when other dark colors would feel too heavy.
It bridges formal and casual. A matte burgundy on short square nails looks casual and modern. The same color, glossy, on longer coffin nails reads as occasion-ready. The color itself doesn’t change — the finish and the shape do all the contextual translation.
It’s the most beginner-friendly dark nail color. Burgundy’s red-purple balance means that minor application imperfections — uneven edges, slight flooding of the cuticle — are less visible than with pure black or deep navy, because the color’s warmth blends more naturally with skin tones at the edges.
30 Burgundy Nail Designs
1. Sleek Burgundy French Tips with Wavy Accents
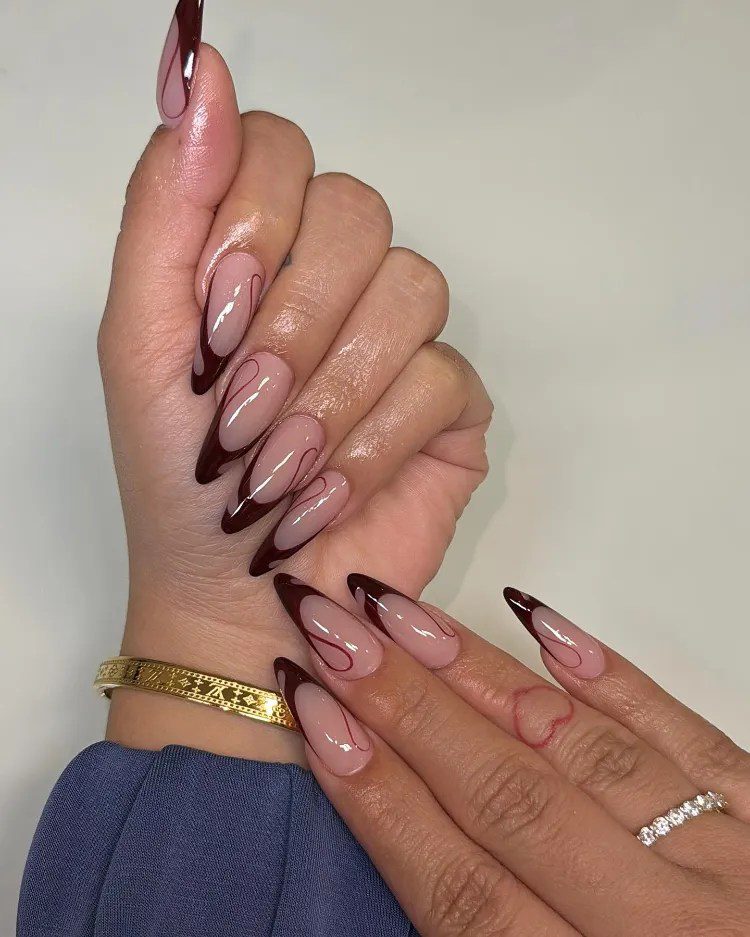
The classic French manicure’s most seductive update: deep burgundy tips on a nude or sheer base, with the tip line given a subtle wavy edge rather than a straight horizontal cut. The wave is barely perceptible — a gentle undulation rather than dramatic swoops — but that slight irregularity transforms the French tip from a format that can read as dated into something that feels contemporary and considered.
The wavy tip line works because it suggests handcraft and intention in a way that a perfectly straight tip doesn’t. Straight French tips look machine-precise; gently wavy ones look artisan.
Best for: Date nights, fall and winter evenings, professional environments that permit polished nail art.
How to recreate it: Apply a sheer or milky nude base. Using a thin nail art brush and burgundy polish, create the tip line with a very gentle freehand wave — practice the motion on paper first until the hand feels comfortable making a smooth, controlled curve. The wave should be subtle enough that it could almost be the natural edge of the nail rather than a deliberate design choice. Glossy top coat.
Nail shape: Almond and oval shapes soften the wavy tip line beautifully. Square and squoval shapes make the wave appear more geometric and intentional.
2. Burgundy with 3D Floral Embellishments and Gold Details
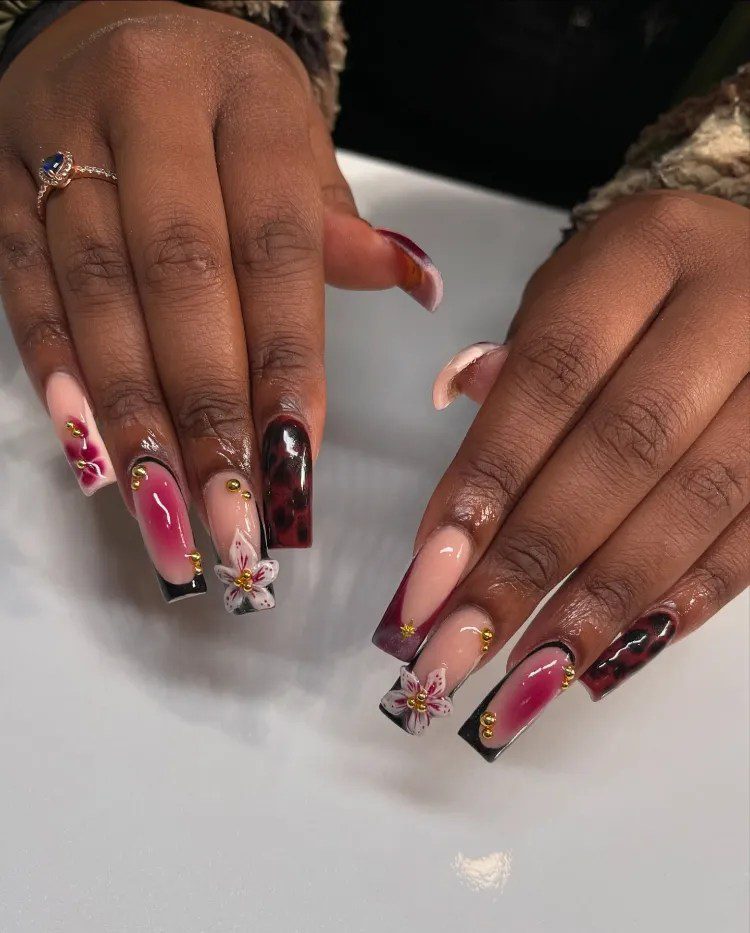
The 3D floral burgundy nail is the most overtly opulent design on this list — dimensional flower accents rising from a rich burgundy base, surrounded by gold leaf or gold foil details that add warmth and luxury to the composition. This design belongs in the category of nail art that functions as jewelry — it’s not simply painted but sculpted, and it rewards close inspection with increasing levels of detail and craftsmanship.
The gold detail is what prevents the 3D florals from looking simply decorative and instead gives them a couture quality — the combination of deep jewel tone and warm metallic reads as intentionally high-end.
Best for: Special occasions, formal events, celebrations, anything where maximum visual impact is appropriate and desired.
How to recreate it: Apply a rich burgundy base. 3D florals can be created with nail acrylic or purchased as pre-made nail art charms — the latter is far more accessible for home application. Press the floral charms into uncured gel or wet nail glue, then position precisely. Add gold foil pieces around the florals by pressing small torn pieces of nail foil against the still-tacky gel surface. Seal with a generous top coat that embeds the raised elements slightly rather than leaving them fully exposed.
Nail shape: Coffin and almond shapes provide the most harmonious backdrop for 3D floral embellishments. The elongated shape gives the dimensional art room to exist without crowding.
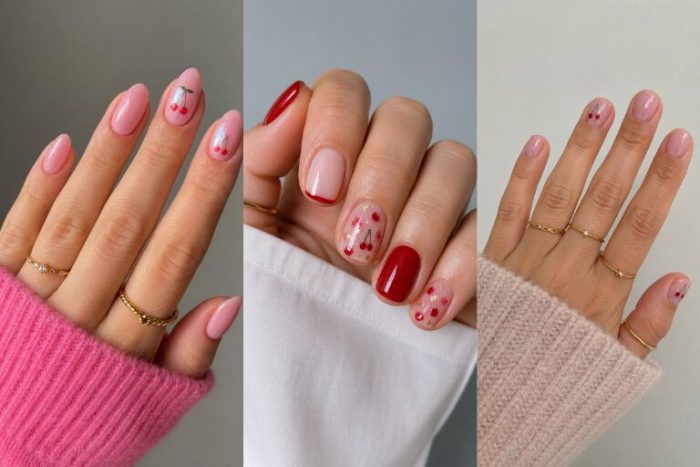
3. Burgundy with Cherry Nail Art Accents
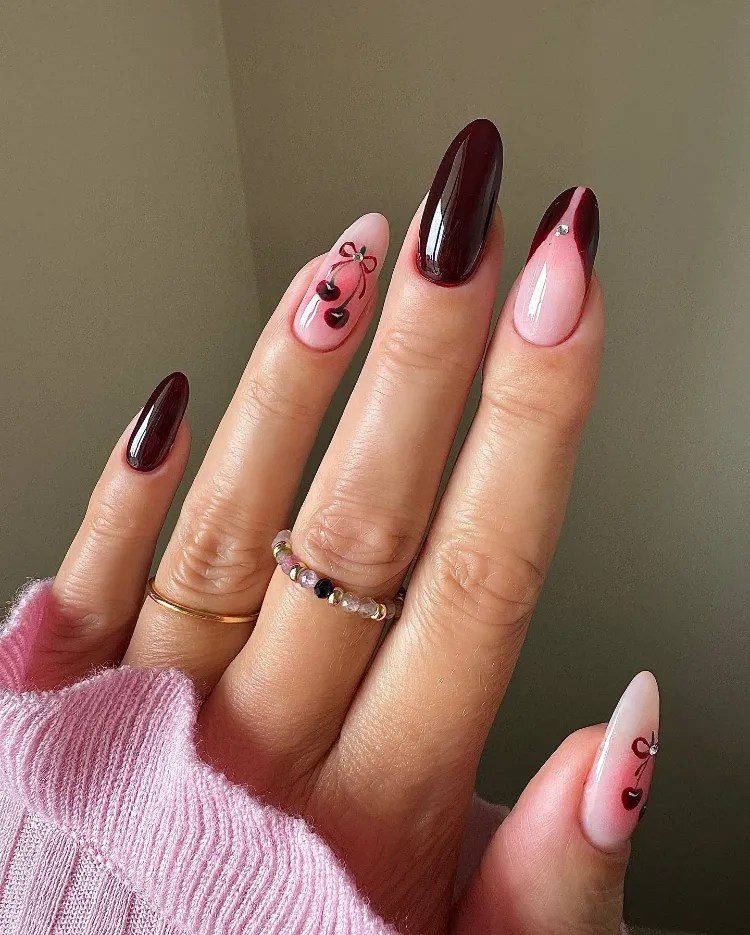
The cherry nail art detail — bright red cherries with green stems painted in a small, precise cluster on one or two accent nails — is one of nail art’s most enduring and universally charming motifs. On a burgundy base, the cherries create a tonal relationship where the red of the cherry echoes the red undertone of the burgundy, making the art feel compositionally integrated rather than randomly placed.
The combination has a chic retro quality — it references the graphic, pop art aesthetic of pin-up and vintage diner imagery without being overtly nostalgic.
Best for: Everyday wear, brunch, casual social occasions, any context where playful sophistication is appropriate.
How to recreate it: Apply a rich burgundy base on most nails. On one or two accent nails (ring finger is the classic choice), apply a slightly lighter or slightly darker burgundy as contrast. Using a fine nail art brush, paint two small red circles close together at the center-upper area of the accent nail, then add thin green stem lines curving upward from each cherry to meet at a central point. A tiny green leaf at the stem junction completes the classic cherry motif. Glossy top coat across all nails.
Nail shape: Works on every nail shape. Round and oval shapes complement the rounded cherry forms particularly well.
4. Burgundy with Rose-Gold Glitter Accents
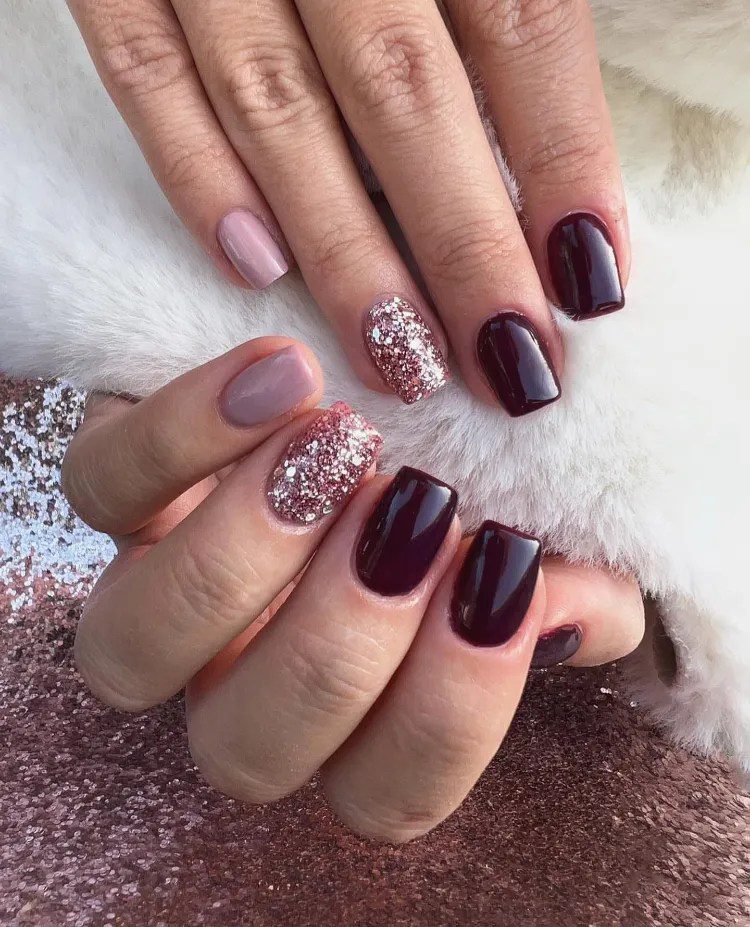
Rose gold glitter on a burgundy base creates a color pairing that’s both expected and genuinely beautiful — the warm, copper-adjacent shimmer of rose gold complements the red-purple depth of burgundy in a way that cool silver glitter doesn’t. Rose gold reads as warm; burgundy reads as warm; together they create a cohesive warmth that photographs exceptionally well in any light.
The glitter can be applied as a full accent nail, as a diagonal section across one nail, or as a scattered placement across multiple nails — each approach creates a different intensity level from the same two elements.
Best for: Holiday season, New Year’s Eve, any occasion where glamour is the appropriate register.
How to recreate it: Apply a rich burgundy base. For the accent nail: apply a thin layer of clear gel or base coat, then press fine rose-gold glitter powder into the wet surface using a small eyeshadow brush or your fingertip. The more evenly distributed the glitter, the more polished the result. A thick, generous top coat is essential to seal the glitter completely rather than leaving a rough, gritty texture.
Nail shape: Every shape carries glitter beautifully. Coffin and stiletto shapes give a glitter accent nail the most dramatic surface area.
5. Burgundy Ombré with Gold Stud Accents
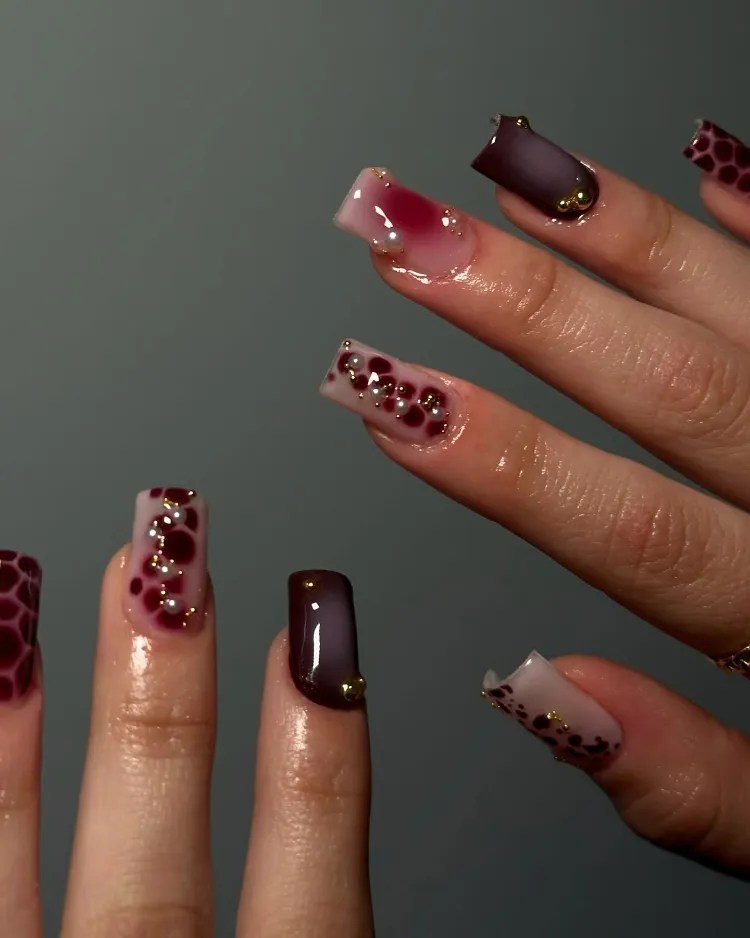
The burgundy ombré — graduating from a lighter plum or muted mauve at the cuticle to a deeper, richer burgundy at the tip — creates a dimensional quality from within the color itself rather than through art or embellishment. Gold stud or rhinestone accents placed along the base of the nail, at the cuticle line, or scattered across the ombré surface add the tactile jewelry-like quality that makes this design feel distinctly luxurious.
Best for: Evening events, date nights, special occasions, any time you want nails that photograph beautifully from every angle.
How to recreate it: The sponge method produces the most accessible ombré at home — apply both burgundy shades to a small makeup sponge side by side and dab repeatedly onto the nail, building gradually. Clean up edges with an acetone brush. Once dry, apply small gold nail studs or micro rhinestones using nail glue or pressing into uncured gel. Seal with a generous top coat over both the studs and the ombré.
Nail shape: Coffin shapes give the ombré gradient the most dramatic sweep. Almond shapes soften the effect beautifully.
6. Burgundy Blooms on Nude Base
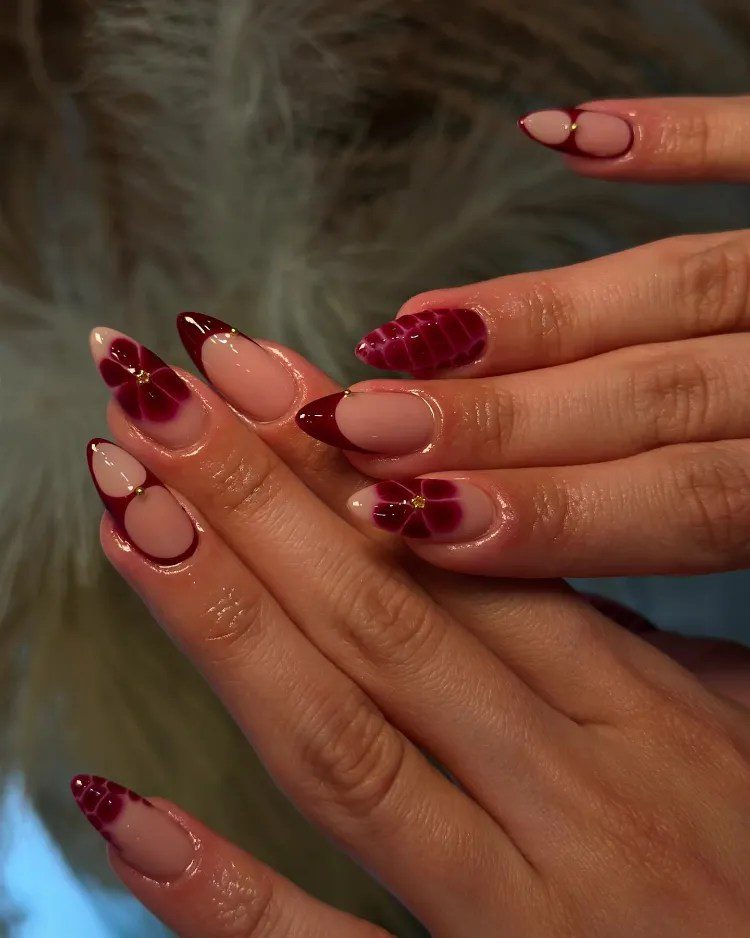
The nude-and-burgundy floral design is the most feminine and the most delicate combination on this list — a soft, warm nude base with hand-painted or stamped burgundy floral effects and thin gold detail lines creates a design that feels bridal without being restricted to bridal events. The nude base keeps the overall impression of the nails light and natural while the burgundy florals add sophistication and seasonal depth.
The gold detail — fine lines that outline or connect the floral elements — is the detail that elevates this from pretty to refined. It communicates a level of craft and intentionality that makes the design feel bespoke.
Best for: Weddings (as a guest or bride), romantic occasions, fall events, any context where delicate sophistication is the desired impression.
How to recreate it: Apply a warm nude or soft blush base on all nails. On two or three nails, use a fine nail art brush with burgundy polish to paint floral shapes — start with a small central dot, then add petal shapes radiating outward. Vary the petal count and size for organic variety. Add thin gold line accents using a striping brush and gold nail polish, tracing around petal edges or adding stems and leaf details. Glossy top coat.
Nail shape: Almond and oval shapes are the most harmonious with floral nail art. The organic curves of these shapes complement the natural quality of flower imagery.
7. Burgundy Abstract Art Nails
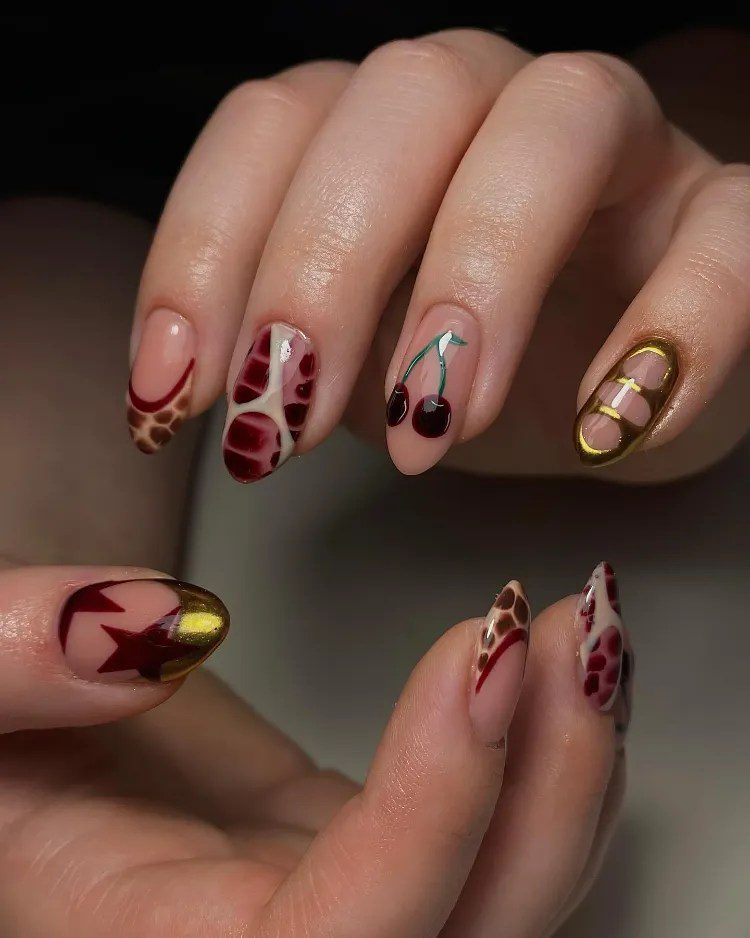
Abstract nail art uses burgundy as one color within a broader composition — swirls, brushstroke marks, negative space, color-blocked sections — creating a design that’s less about specific imagery and more about the visual relationship between shapes and colors. The burgundy reads as the “deep” note in the composition, providing richness and contrast against lighter elements (cream, nude, soft pink) or metallic accents.
The glossy finish is essential to abstract nail art’s success — it creates the appearance of depth and intentionality that makes abstract designs read as art rather than accident.
Best for: Creative workplaces, art and fashion events, anyone who wants their nails to communicate aesthetic sensibility.
How to recreate it: Plan the composition before starting — sketch the design for each nail on paper. Apply a neutral or sheer base. Use a fine nail art brush to paint abstract elements in burgundy — loose, expressive strokes work better than tightly controlled lines, as they have more visual energy. Negative space (areas of bare or light-colored nail left visible) is a key element of successful abstract nail art. Finish with glossy top coat to unite all elements under the same surface.
Nail shape: Abstract nail art looks most compelling on square and coffin shapes where the nail’s geometric quality creates an interesting relationship with the organic marks.
8. Burgundy Aura Nails with 3D Florals
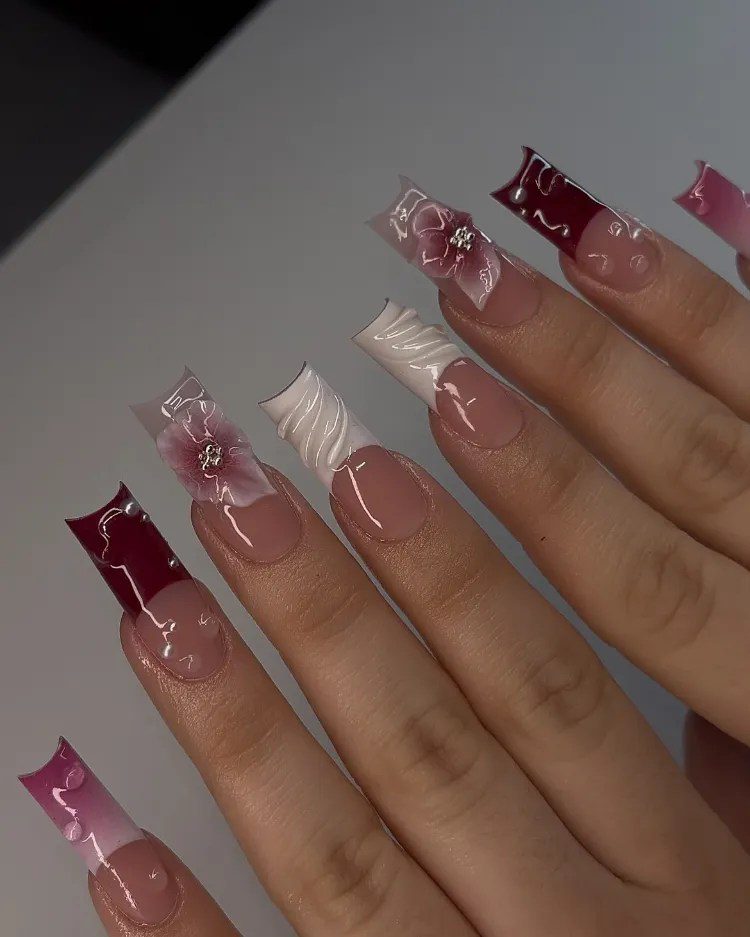
The aura nail technique — a soft, diffused gradient that creates an almost glowing quality from the center of the nail outward — gives burgundy a luminous, ethereal quality that solid color application can’t achieve. Combined with 3D floral embellishments, the aura base creates a dimensional backdrop that makes the florals appear to be blooming from within a glowing surface rather than simply sitting on top of a flat base.
Best for: High-fashion occasions, editorial looks, nail appointments where investment in process is appropriate.
How to recreate it: Apply a nude or sheer base. Using a small eyeshadow brush or sponge, stipple a concentrated application of burgundy polish at the center of the nail, then blend outward with lighter pressure so the color diffuses toward the edges. Multiple stippling passes build the depth of the aura. Once dry, add 3D floral charms pressed into uncured gel and sealed with top coat.
Nail shape: Coffin and almond shapes show the aura gradient most symmetrically and most beautifully.
9. Burgundy, White, and Cherry on Stiletto Nails
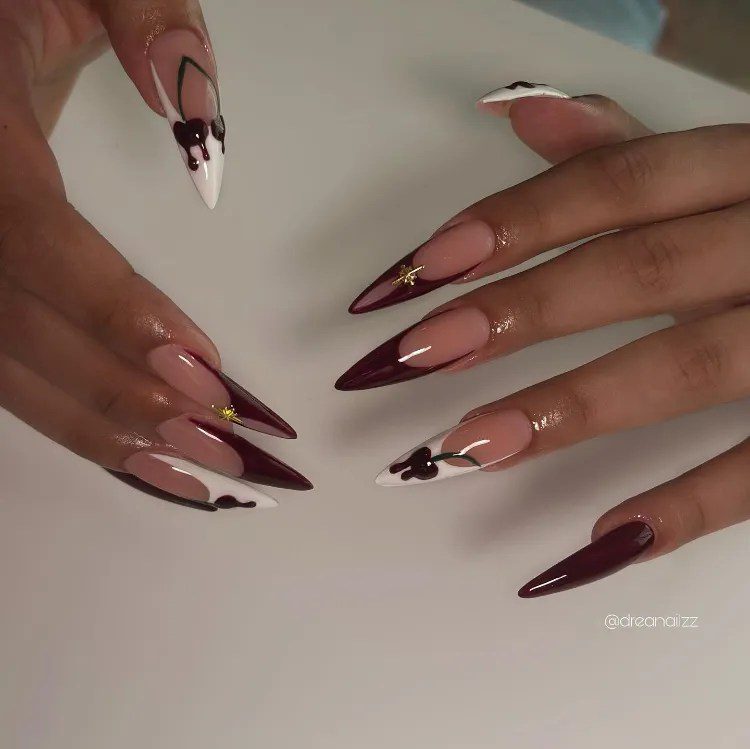
The sharp angle of stiletto nails gives any design a deliberately dramatic quality, and this combination — alternating burgundy, crisp white, and cherry-detail nails — uses that drama to create a set that’s both high-fashion and genuinely playful. The white nails provide breathing space that prevents the rich burgundy from dominating the whole hand, and the cherry accents on the white nails create the surprise element that makes the set worth looking at closely.
Best for: Fashion-forward events, occasions where bold personal expression is celebrated, nail enthusiasts who want their manicure to be a genuine statement.
How to recreate it: Apply burgundy on three nails and white on two nails, alternating across the hand. On the white nails, paint the cherry motif (two red circles with green stems meeting at a central point, small green leaf) using a fine detailing brush. The scale of the cherry art should be proportionate to the sharp, narrow stiletto tip — keep it small and precise. Glossy top coat on all nails.
Nail shape: Stiletto specifically. The sharp point is integral to this design’s overall aesthetic.
10. Burgundy Tips with Leopard Print Accents
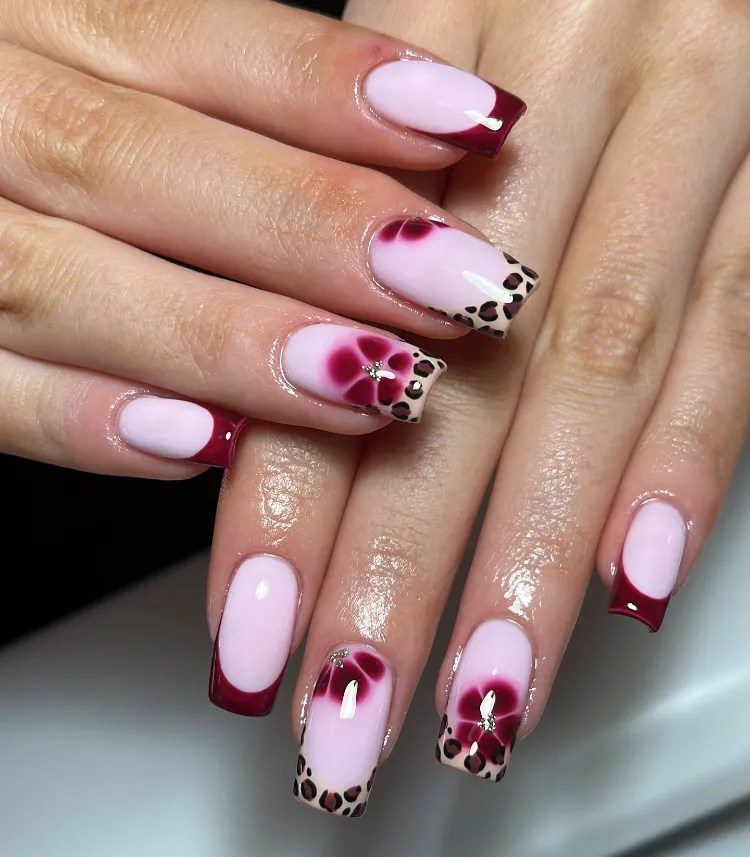
The combination of burgundy and leopard print is one of the most fearlessly stylish design choices in nail art — both elements are bold statements independently, and together they create something that’s simultaneously glamorous and slightly feral in the best possible way. The leopard print is kept to one or two accent nails to prevent the overall design from becoming visually overwhelming, while the burgundy tips on a soft pink or nude base provide the polished framework.
Best for: Bold personal style occasions, fashion events, any context where visual daring is appropriate and appreciated.
How to recreate it: Apply a soft pink or nude base on all nails. Create burgundy French tips on most nails. For the leopard accent nails, apply a warm tan or caramel base, then use an irregular dotting technique with a medium-sized dotting tool and brown polish to create the leopard spots — clusters of irregular dots and half-moon shapes. Outline each spot cluster with a fine brush in black. A glossy top coat across all nails unifies the different designs.
Nail shape: Coffin and almond shapes carry the leopard print most elegantly. Square shapes give it a more graphic, pattern-design quality.
11. Burgundy Swirls on Nude Base
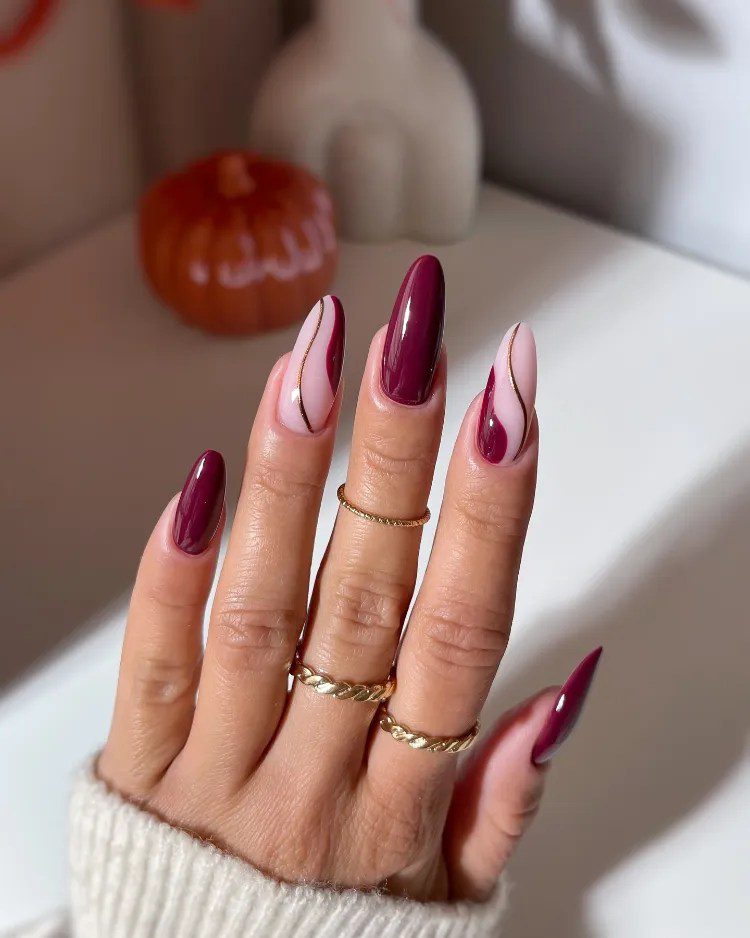
The swirl pattern — thin, flowing curved lines drawn with a fine brush in burgundy across a nude base — creates one of nail art’s most meditative and elegant designs. Unlike geometric or character-based nail art that reads quickly, swirl designs reward sustained attention: the eye follows each line through its curve and intersection with others, creating a constantly shifting visual experience.
Best for: Everyday elevated wear, creative professional environments, anyone who wants nail art that’s genuinely interesting to look at without being showy.
How to recreate it: Apply a warm nude or soft beige base. Using a thin striping brush and burgundy polish, draw flowing curved lines from one side of the nail to the other — the key is continuous, confident strokes rather than tentative short marks. Overlay some lines over others for depth. The negative space of the nude base showing between the swirls is as important as the swirls themselves. Glossy top coat.
Nail shape: Longer nail shapes (almond, coffin, stiletto) give the swirls more room to develop their full curves. Short nails can carry one or two swirls rather than a full composition.
12. Burgundy French Tips with Heart Accents
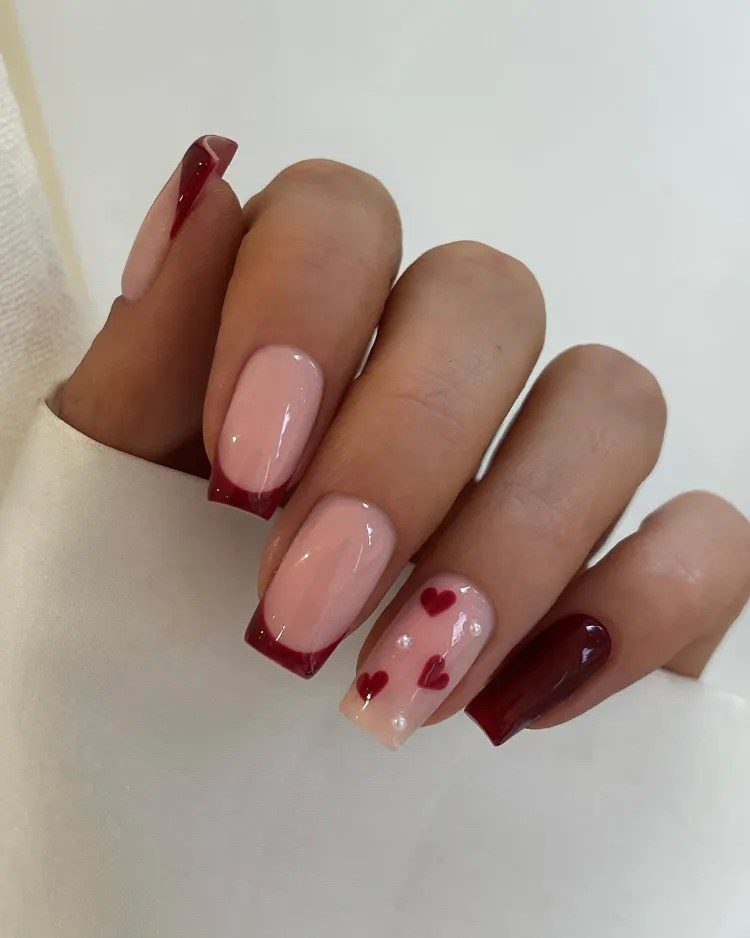
The heart detail on a burgundy French tip nail is the most romantic and most occasion-specific design on this list — and it’s perfectly calibrated for its intended context. Small, precise hearts painted at the inner corner of the French tip (or placed as a scatter across the nude base) transform a polished neutral design into something that communicates warmth and romance without being excessively sentimental.
Best for: Valentine’s Day, anniversary occasions, romantic dinners, any situation where expressing affection through aesthetic choice feels appropriate.
How to recreate it: Apply a sheer or nude base. Create clean burgundy French tips using tip guides for precision. Using a very fine nail art brush or a small dotting tool with burgundy polish, paint small hearts at the corner of the tip line or scattered across the base nail. Perfect heart shapes require two small dots placed side by side, then a dragging motion downward from each dot to a central point. Glossy top coat.
Nail shape: Almond and oval shapes give the hearts a soft, romantic setting. Square shapes make the hearts read as more graphic and contemporary.
13. Burgundy Tips, Animal Print, and Cherry Mix
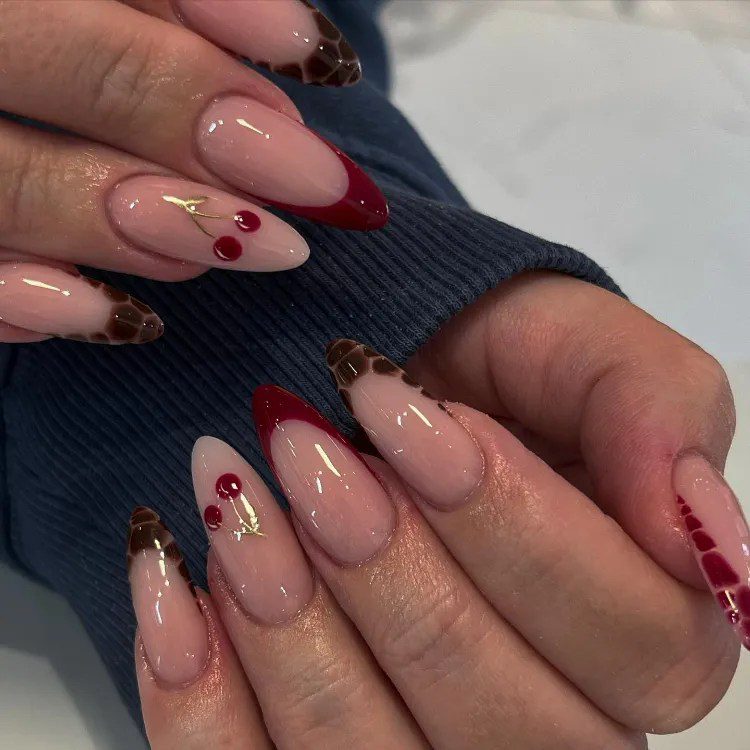
This design combines three distinct elements — burgundy French tips, animal print on one nail, and cherry art on another — within a unified palette that prevents the combination from becoming chaotic. The challenge and the success of this design lies in the tonal coherence: the burgundy tips, the warm browns of the animal print, and the red of the cherry art all share warm undertones that make them feel like they belong together despite being three completely different visual languages.
Best for: Bold personal style, occasions where maximalist aesthetic expression is welcome, nail enthusiasts who enjoy visual complexity.
How to recreate it: Apply a soft pink or nude base on all nails. Create burgundy French tips on three nails. On one nail, create the leopard print as described in design #10. On another nail, paint the cherry motif on a white or cream accent base. The visual success depends on the palette coherence — keep all elements within the warm orange-red-burgundy-brown family.
Nail shape: Works on every nail shape. Coffin and almond shapes carry the mixed elements with the most grace.
14. Burgundy French Tips with Pearl Dot Accents
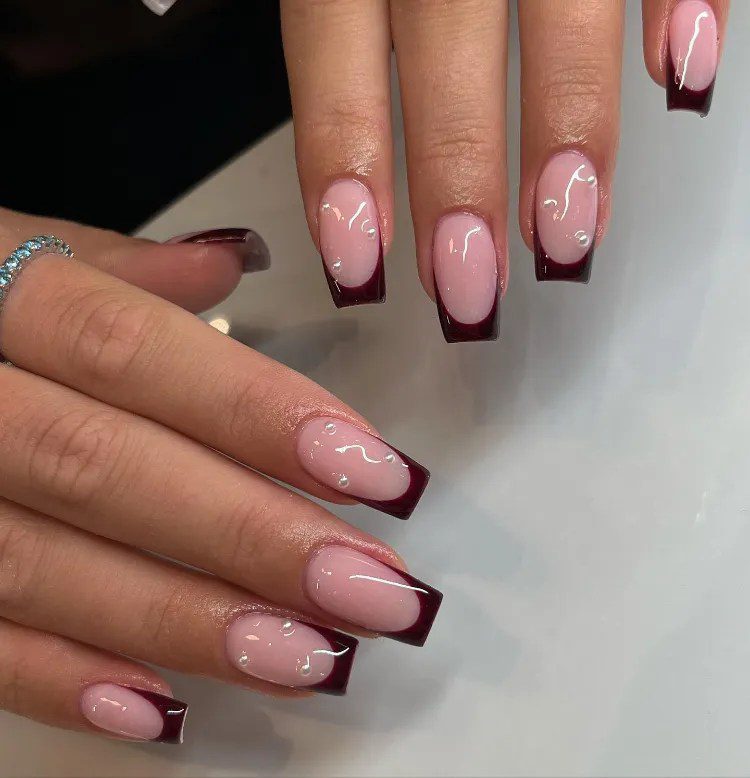
The pearl dot accent — small, rounded dots placed in a deliberate pattern near the cuticle or along the tip line using pearl-finish polish or actual pearl nail studs — gives a minimalist burgundy French tip design a luxurious, delicate quality that’s specifically different from rhinestone embellishment. Rhinestones sparkle; pearls glow. The distinction matters aesthetically: pearls communicate quiet refinement where rhinestones communicate celebration.
Best for: Professional settings, everyday elevated wear, occasions where refined restraint is more appropriate than obvious glamour.
How to recreate it: Apply a soft pink or sheer base. Create clean burgundy French tips. Using a small dotting tool and pearl-finish white polish, place small dots in a consistent pattern near the cuticle line — three dots in a small triangle arrangement, or a single line of three to five dots following the natural curve of the cuticle. Alternatively, apply actual pearl nail studs pressed into uncured gel or nail glue. Glossy top coat.
Nail shape: Almond and oval shapes give the pearl dots the most elegant setting. Round shapes also work beautifully.
15. Short Burgundy Nails with Gold Glitter Accents
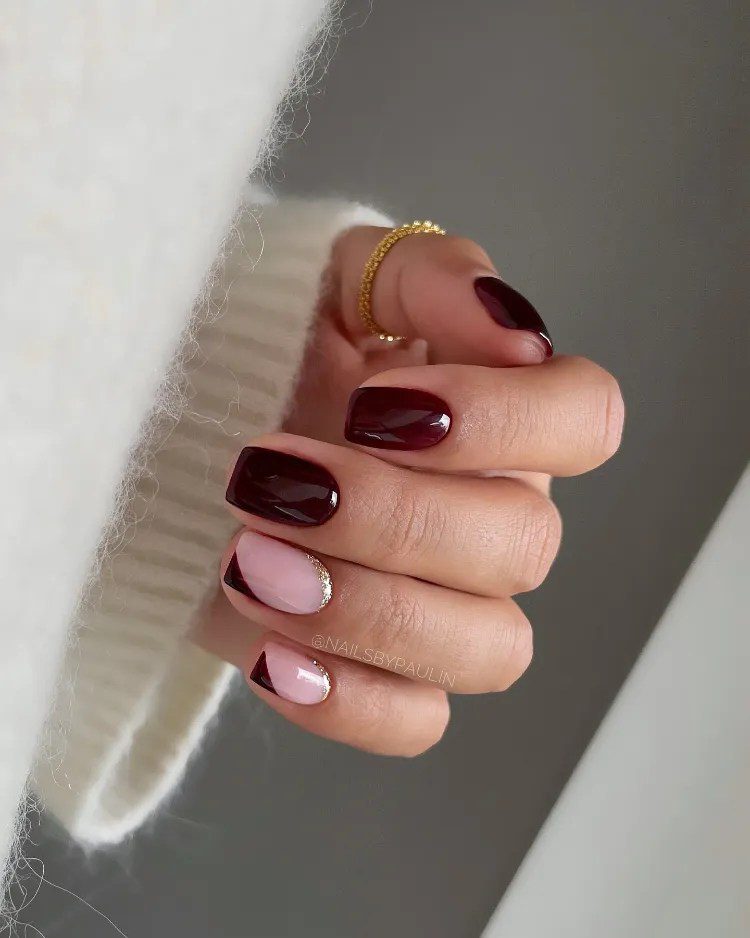
This design specifically addresses the shorter nail length — not as a consolation or limitation, but as an intentional aesthetic choice. Short nails in a rich burgundy with subtle gold glitter accents on one or two nails look polished, practical, and genuinely elegant. The short length makes bold color choices feel less intimidating and more everyday-appropriate, while the gold glitter accents add occasion-readiness.
Best for: Professional environments where longer nails aren’t practical, everyday wear, women who prefer short nails and want their polish choice to feel as considered as longer nail designs.
How to recreate it: Apply a rich burgundy on all nails. On one or two accent nails, apply a thin clear layer and press fine gold glitter into the wet surface, concentrating slightly more glitter toward the tip for a gradient effect. Or apply a gold glitter polish over the burgundy base for a slightly different, more uniformly sparkly result. Thorough top coat sealing is especially important on short nails where the art has less surface area to work with.
Nail shape: Short square, squoval, and round shapes all carry this design with equal elegance.
16. Classic Burgundy and Nude Contrast
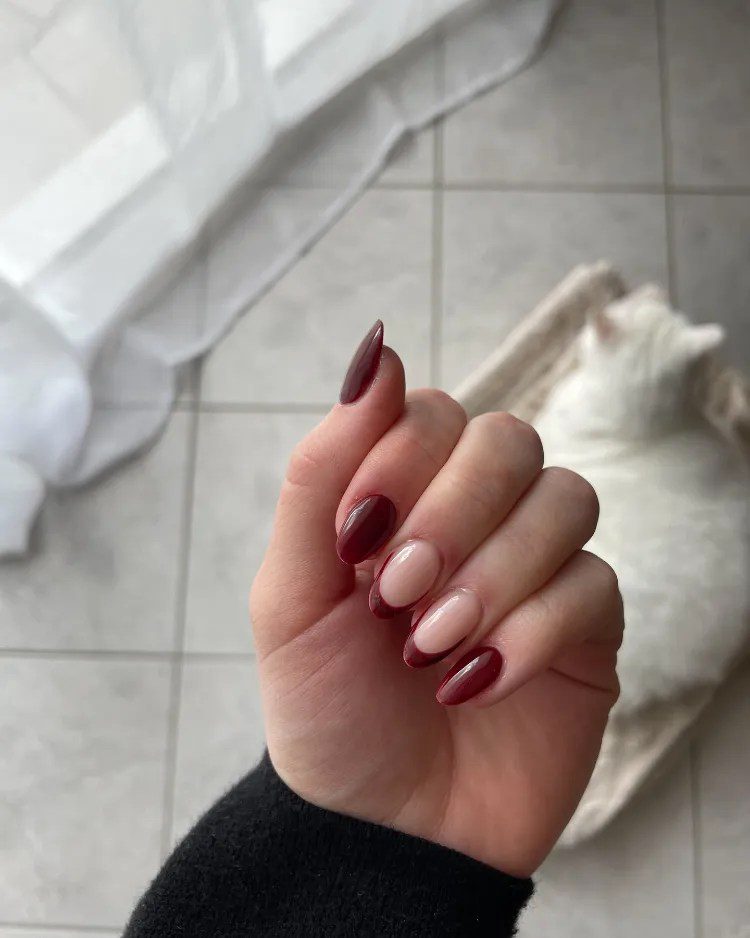
The alternating burgundy and nude nail design is the most consistently wearable and most reliably flattering approach to burgundy nails — the nude nails create visual breathing space that prevents the rich burgundy from feeling heavy across all ten nails, while the burgundy nails provide the depth and sophistication that a full nude manicure lacks.
Best for: Everyday wear, professional environments, any occasion across fall, winter, and beyond. The most truly all-occasion design on this list.
How to recreate it: Apply a warm nude (matching your skin tone or one to two shades deeper for the most natural result) on three to four nails. Apply a rich burgundy on the remaining nails. Keep the finish consistent — either all glossy or all matte — to unify the contrasting colors into a coherent set.
Nail shape: Works on every nail shape and every nail length. The simplicity of this design is its greatest practical asset.
17. Burgundy Aura with Abstract Tip Accents
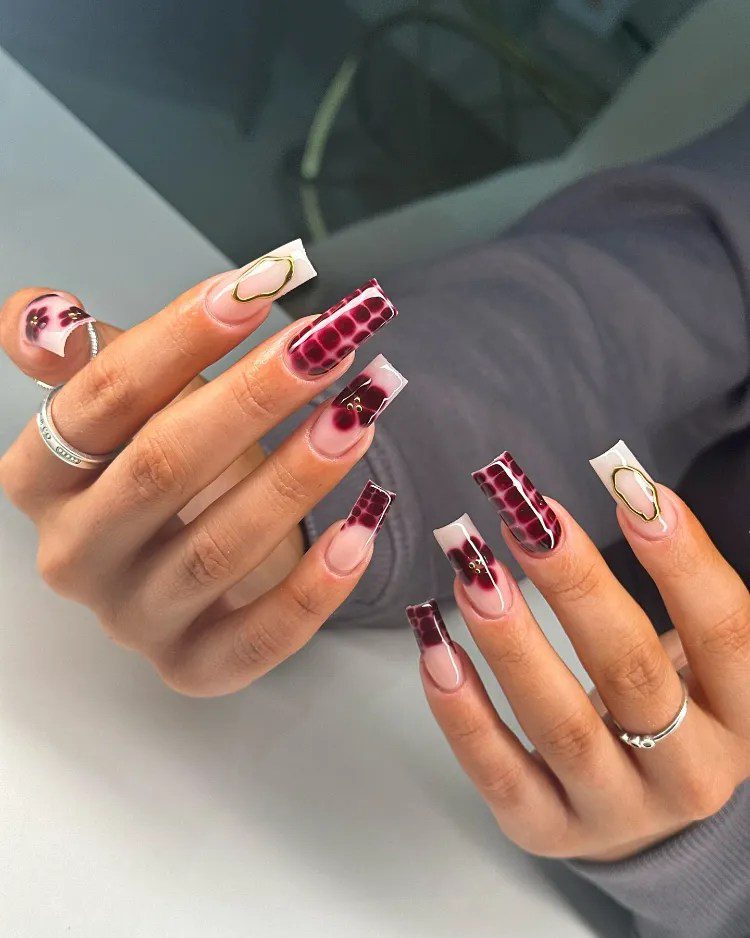
The aura base technique (stippled, diffused color application creating a glowing center effect) on some nails combined with bold burgundy abstract tip accents on others creates a design that has both softness and edge within the same set. The aura nails feel ethereal; the abstract tip nails feel decisive. The contrast between the two creates visual interest across the hand.
Best for: Creative professionals, fashion-forward occasions, nail enthusiasts who enjoy experimental techniques.
How to recreate it: On two or three nails, create the aura effect (stippled burgundy at the center, diffusing outward toward the edges). On the remaining nails, create abstract tip accents with a fine brush — irregular shapes, color-blocked sections, or organic marks in burgundy at the tip of the nail. Glossy top coat across all nails to unify the two different techniques.
Nail shape: Coffin and almond shapes carry both techniques most elegantly.
18. Burgundy with Delicate Bow Accents
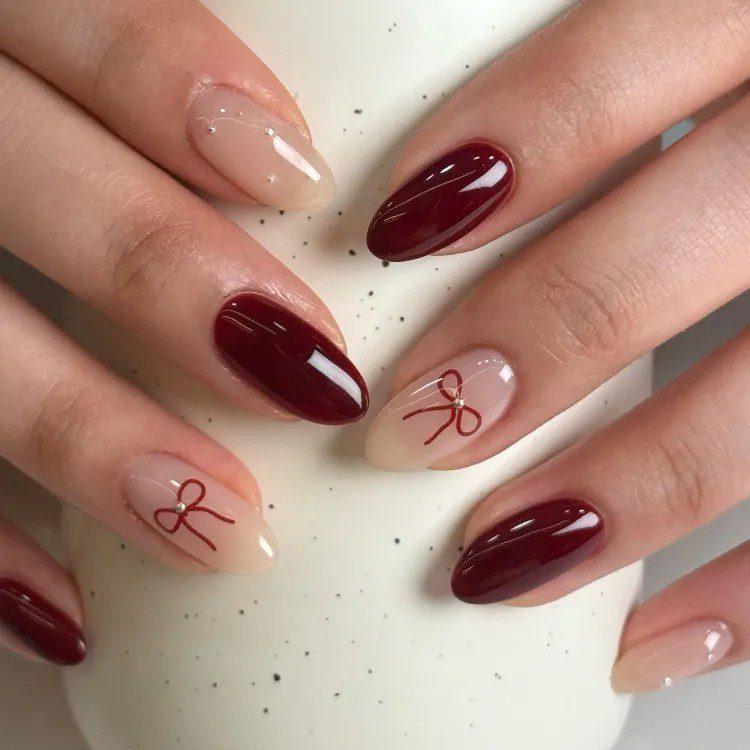
The bow detail on burgundy nails creates a specific aesthetic tension — the richness and depth of the burgundy against the delicate, feminine quality of a small white or nude bow creates an unexpected but genuinely charming combination. The bow shouldn’t be large or dramatically 3D; a small, precisely rendered bow at the center of the nail or at the base of the tip is the most sophisticated interpretation.
Best for: Holiday occasions, romantic events, Galentine’s Day, any context where feminine detail is appropriate and enjoyable.
How to recreate it: Apply a glossy burgundy base on most nails and a nude or milky base on one or two accent nails. On the accent nails, paint small bows using a fine nail art brush: two small triangular wing shapes meeting at a central point, with a small rounded knot in the center. White or ivory bow detail on the nude accent nail; a nude or pale pink bow on the burgundy base nail. 3D bow nail charms pressed into gel or glue are an even simpler alternative. Glossy top coat.
Nail shape: Any shape carries bows beautifully. Medium-length nails give the bow enough surface area to be legible.
19. Burgundy with Thin Gold Stripe Accents
The gold stripe nail is the most minimal and most versatile embellishment in the entire burgundy nail design category. A single thin gold line drawn horizontally across the nail near the base, diagonally from corner to corner, or vertically down the center adds a metallic accent that immediately reads as expensive and deliberate without requiring any complex nail art skill to execute. The gold stripe on a burgundy base specifically creates a combination with genuine art history resonance — it references the graphic elegance of Art Deco design.
Best for: Weddings (as a guest), parties, any occasion where minimal elegance is the goal.
How to recreate it: Apply a rich burgundy base on all nails or most nails, with almond or nude on accent nails. Using a thin striping brush or nail striping tape, draw a single gold line in the intended direction on each decorated nail. Striping tape can be applied to wet polish, then removed carefully before top coating to create the most precise line. A thin striping brush with gold polish applied in a single confident stroke also produces a clean result with practice. Glossy top coat seals everything.
Nail shape: Almond nails carry the gold stripe most elegantly. Square nails give it the most geometric, graphic quality.
20. Burgundy Floral Charm Nails
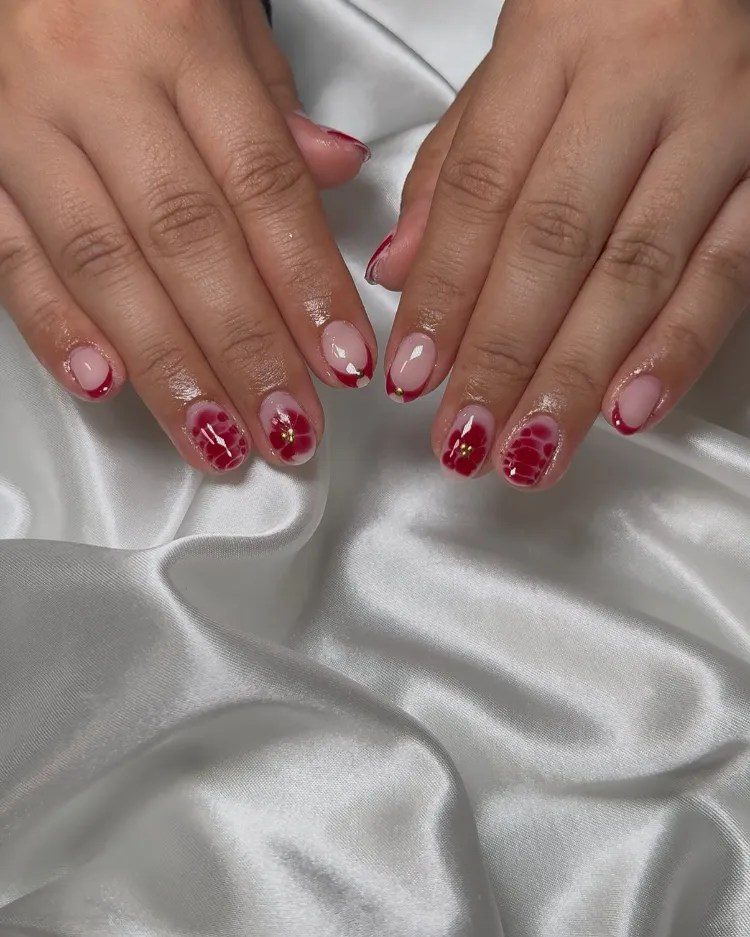
The floral charm nail design pairs small, precise floral art on the nail tip — blooms that appear to perch at the edge of the nail rather than floating in the center — with a clean burgundy base that gives the flowers their setting. The tip placement specifically creates the impression of flowers growing at the edge of the nail, which has an organic, naturalistic quality that center-placed florals don’t achieve.
Best for: Everyday wear, autumn occasions, spring (where the floral element reads as particularly seasonal), and any context where delicate detail is appreciated.
How to recreate it: Apply a rich burgundy base. Using a fine nail art brush, paint small flower shapes at the tip of the nail — a central dot surrounded by small oval petals. Keep the flowers small and delicate relative to the nail surface; larger florals at the tip create a heavier, more embellished impression. A gloss top coat gives the flowers a luminous, botanical quality.
Nail shape: Almond and round nail shapes make the tip-placed florals look most natural. Shorter nails carry tip art particularly well.
21. Burgundy Petal Tips with Gold Embellishments and Sheer Accent Nails
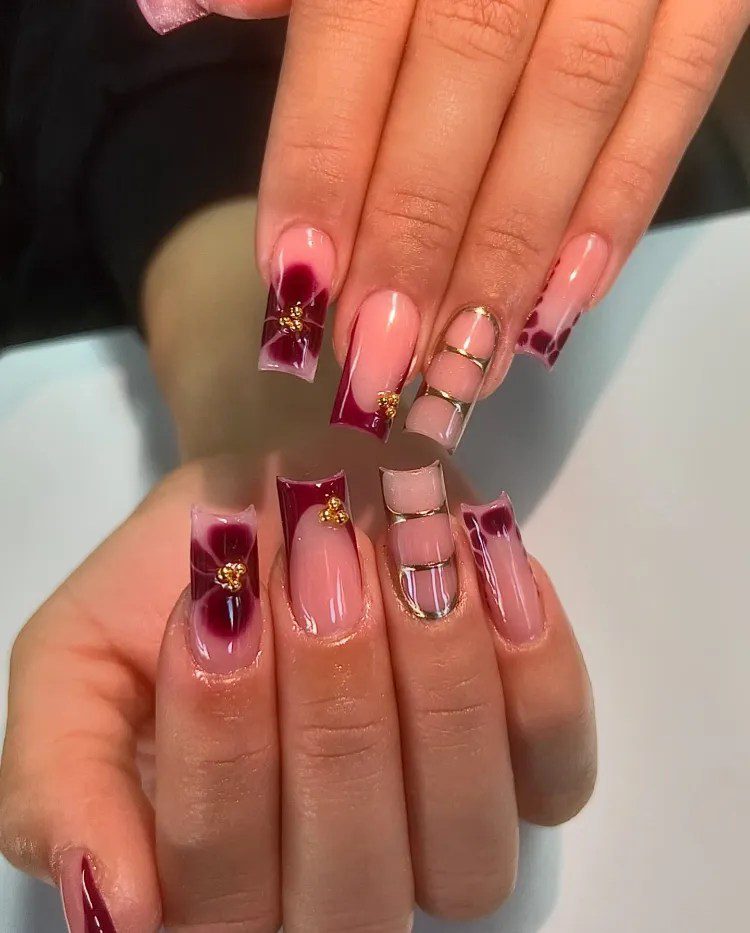
This design uses a specific technique where the French tip line is replaced by a petal-shaped edge — the tip of the nail is decorated with overlapping petal forms in burgundy rather than a straight or curved line — creating a tip that appears to bloom. Combined with gold rhinestone or foil embellishments and one completely sheer or glass-finish accent nail for contrast, the overall design has a high-fashion editorial quality that’s genuinely distinctive.
Best for: Fashion events, nail appointments where investment in complexity is appropriate, occasions where you want your nails to be the most interesting in the room.
How to recreate it: Apply a sheer or nude base on most nails and a truly sheer or glass-finish top coat on the accent nail. For the petal tip nails, use a fine brush to paint overlapping petal shapes at the nail tip in burgundy — each petal is a rounded teardrop that overlaps the adjacent one. Add gold foil pieces or small rhinestones at the points where the petals meet. Seal with a careful top coat that protects the embellishments.
Nail shape: Coffin and almond shapes give the petal tip design the most surface area and the most graceful presentation.
22. Burgundy Flames with Gold Outlining
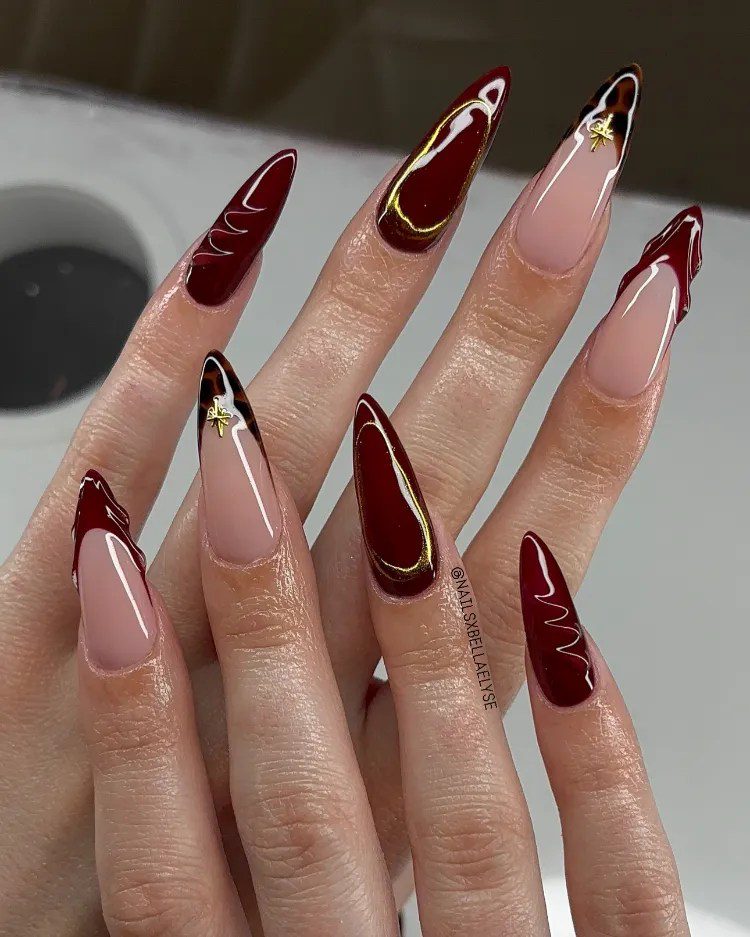
The flame nail pattern — stylized fire shapes that sweep from the base of the nail upward toward the tip — has moved from subcultural nail art into genuinely mainstream fashion territory, and the burgundy-with-gold-outline version is its most sophisticated and refined interpretation. The gold outlining of each flame shape adds the precise, jeweler’s detail that elevates the design from graphic to genuinely artful.
Best for: Bold style occasions, fashion-forward events, evening outings where statement nails are appropriate.
How to recreate it: Apply a nude, cream, or sheer base. Using a thin nail art brush and burgundy polish, paint flame shapes starting from the base of the nail — flame forms are organic and asymmetric, tapering to irregular points at the tip. Multiple overlapping flame shapes on each nail create depth. Once the burgundy flames are dry, use a gold striping brush to outline each flame’s edge precisely. A glossy top coat gives the gold outline its most luminous quality.
Nail shape: Almond and stiletto shapes give flame nail art its most naturally extending quality. Coffin shapes create a more architectural flame composition.
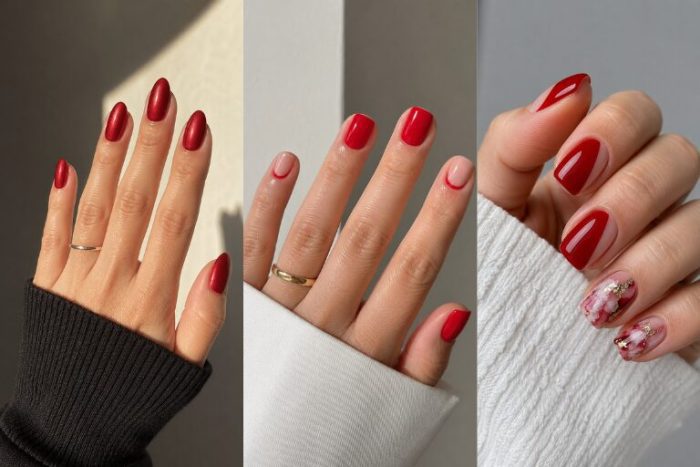
23. Deep Glossy Burgundy Coffin Nails
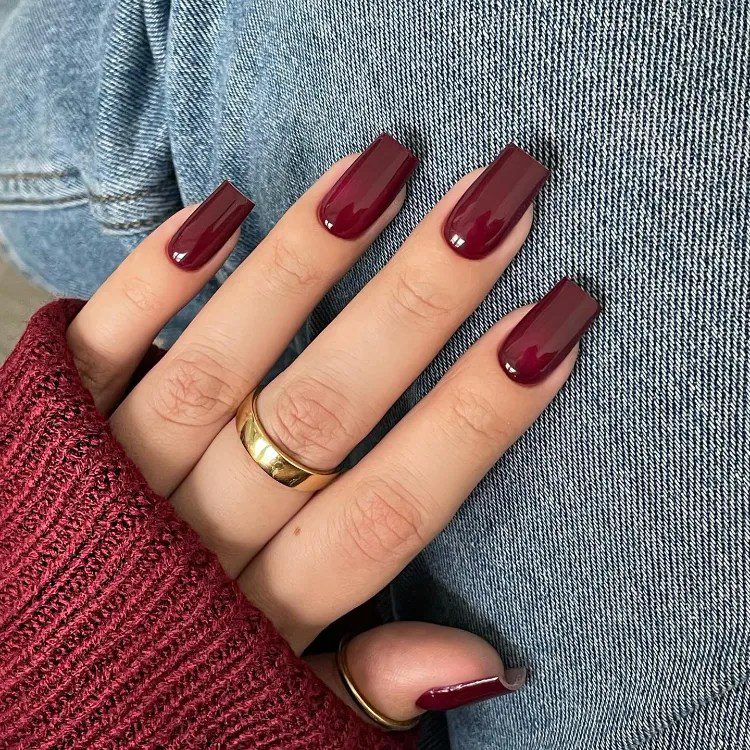
The solid, deep, maximally glossy burgundy coffin nail is the most powerful and most quietly confident design on this list. It requires nothing — no art, no embellishment, no accent color — to communicate everything. The depth of the color, the precision of the application, and the quality of the glossy finish do all the work. This is the design that proves a great color, perfectly applied, is its own most complete statement.
Best for: Absolutely every occasion. The most universally appropriate burgundy nail design available. Fall, winter, professional, casual, formal, festive — this works everywhere.
How to recreate it: The execution quality is everything for a solid color nail. Three thin coats of burgundy rather than two thick ones produce a more even, chip-resistant result. Seal the free edge of the nail with every coat. A high-quality gel top coat produces a deeper, more glass-like gloss than regular top coat — the investment in quality finishing product makes a visible difference on a solid color nail where there’s nothing else to draw the eye.
Nail shape: Coffin is the specified shape and produces a specifically contemporary, fashion-conscious result. The deep burgundy looks equally powerful on almond, stiletto, and square shapes.
24. Burgundy and Gray Abstract Wave Nails
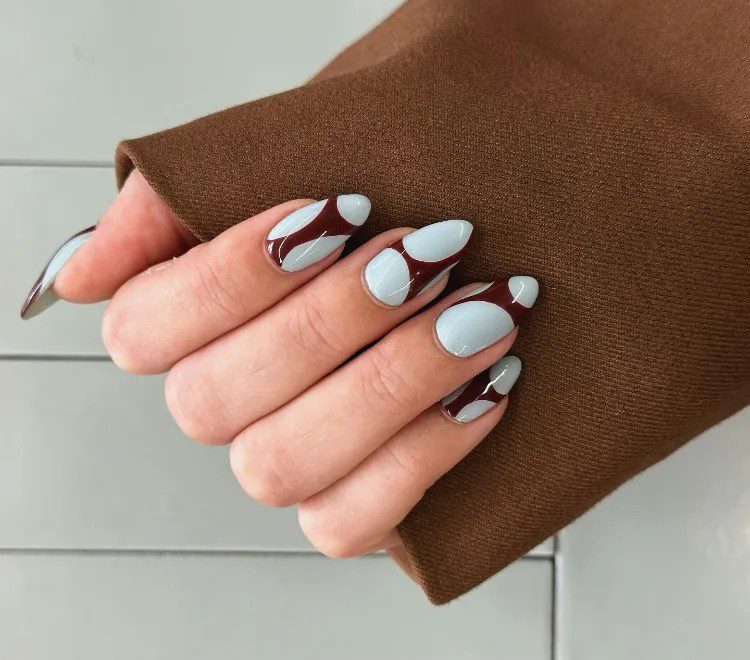
The abstract wave — a flowing, curved line that moves across the nail in smooth, organic arcs — is one of nail art’s most elegant and most accessible designs for home application. Using burgundy and soft gray together, the waves create a sophisticated, almost Japanese-inspired minimalism: the boldness of the burgundy softened by the cool, quiet quality of the gray.
Best for: Everyday elevated wear, creative professional environments, any occasion where modern minimalism is the aesthetic priority.
How to recreate it: Apply a soft gray base on some nails and a white or nude base on others. Using a thin striping brush and burgundy polish, paint flowing wave lines across the nail — continuous, confident arcs rather than small, tentative strokes. The gray nails carry burgundy waves; the lighter nails can carry gray wave lines for a reversed palette variation on alternate fingers. Glossy top coat.
Nail shape: Longer nails give the wave arcs the most room to develop. Square nails create the most striking geometric-organic contrast with the flowing wave lines.
25. Burgundy with 3D Petal and Rhinestone Accents
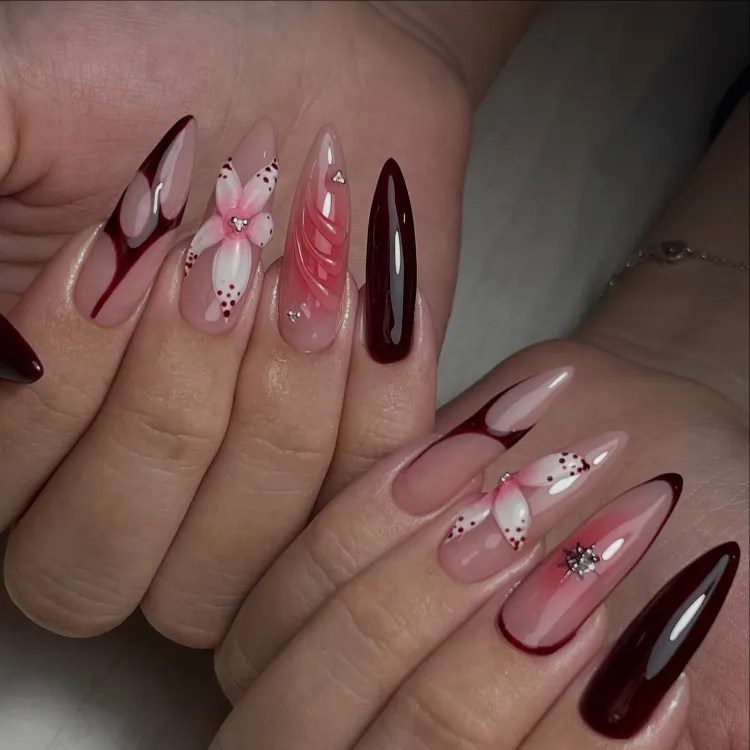
This design takes the 3D floral approach to its most romantic and detailed expression — individual petals applied with dimension rather than painted flat, combined with rhinestone accents that catch light from every angle. The combined effect of texture (3D petals) and sparkle (rhinestones) creates a surface quality that genuinely resembles jewelry rather than nail polish.
Best for: Weddings, formal occasions, any event where maximum femininity and luxury is the intended aesthetic.
How to recreate it: Apply a glossy burgundy base. Using clear nail gel or strong nail glue, position pre-made 3D petal nail charms (available in multiple sizes from nail art suppliers) in a cluster at one corner or the center of the designated accent nails. Press small rhinestones between the petals to fill gaps and add sparkle. Seal with a top coat that’s thick enough to partially embed the dimensional elements — fully exposed 3D elements are more prone to snagging and loss.
Nail shape: Coffin and almond shapes provide the best setting for 3D embellishment. Medium to longer nails are needed to give the dimensional elements proportional space.
26. Classic Glossy Burgundy Almond Nails
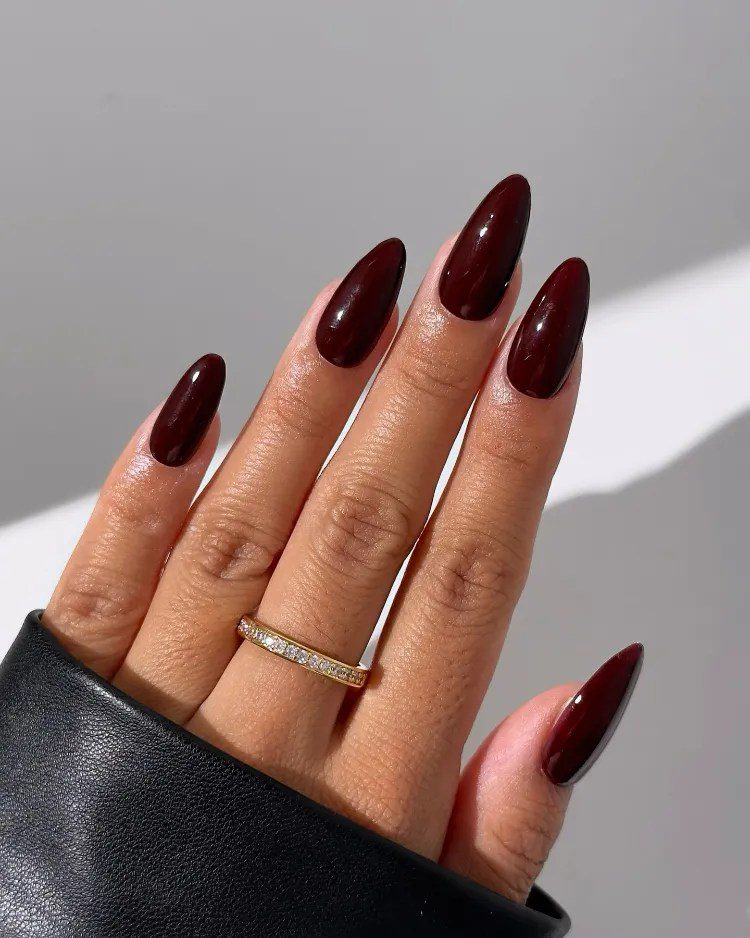
The almond shape is the most universally flattering nail shape — its tapered tip elongates every finger and its rounded sides complement most hand shapes. In a classic, deep, glossy burgundy, almond nails create a manicure that’s sophisticated, refined, and completely timeless. Like the coffin design (#23), this is a solid-color design where the quality of the finish and the precision of the shape are the entire statement.
Best for: Every occasion. The most classical and most enduring burgundy nail design on this list.
How to recreate it: Perfect almond shaping requires either professional filing or a nail file with a light hand and patience — the goal is a consistent taper on both sides meeting in a smooth, not sharp, central point. Apply rich burgundy in three thin coats. A high-gloss top coat applied in two thin layers (rather than one thick one) produces the most glass-like finish.
Nail shape: Almond specifically. The shape is integral to this design’s elegance.
27. Burgundy Stars on Nude Base
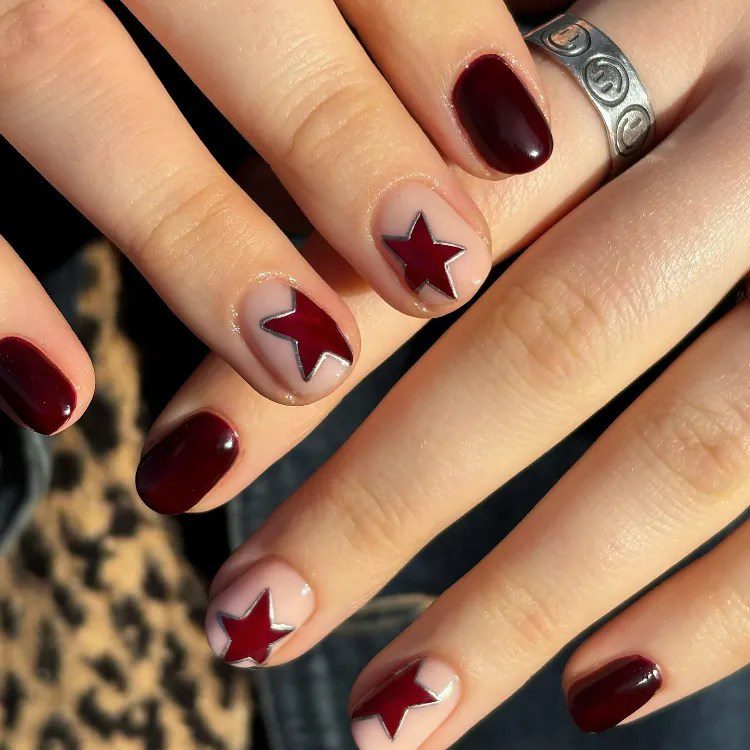
The star motif on a nude base with burgundy polish creates a design that functions as celestial nail art — clean, graphic, and seasonally versatile in a way that most character-based nail art isn’t. Small, precise star shapes scattered across the nude base (or concentrated on one or two accent nails) have a whimsical quality that’s completely distinct from both the floral and abstract designs on this list.
Best for: Holiday season, fashion-forward everyday wear, anyone who wants nail art that’s playful without being seasonal.
How to recreate it: Apply a warm nude base on most nails and a burgundy base on one or two accent nails. Using a small star stamping plate or a fine nail art brush, paint five-pointed star shapes in burgundy on the nude nails — vary the sizes slightly for a natural scattered quality. On the burgundy accent nails, paint small nude or gold stars for the inverse palette. Glossy top coat.
Nail shape: Any shape. The star motif works particularly well on square nails where the geometric quality of the star complements the geometric nail shape.
28. Burgundy Flame Nails with Detailed Gold Accents
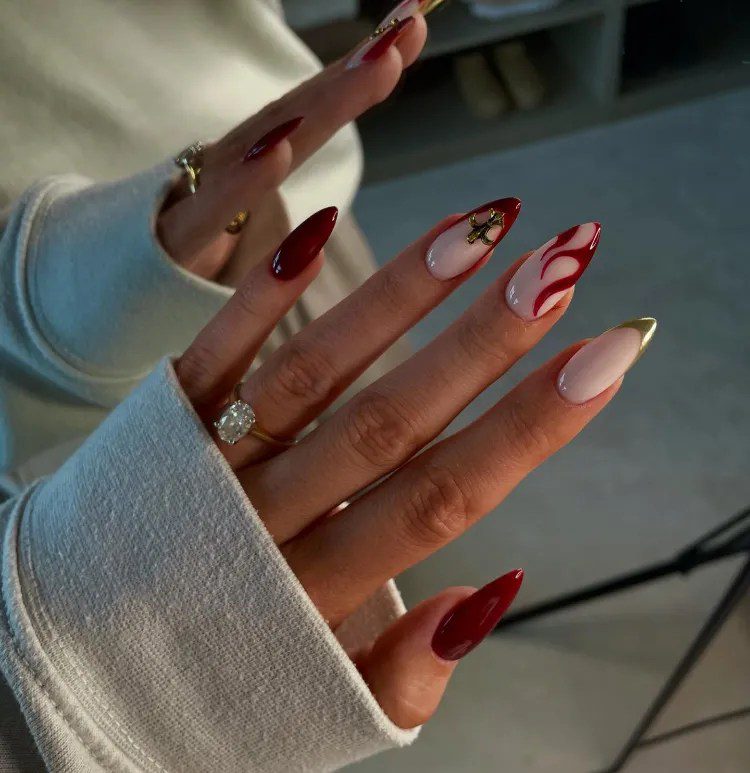
The second flame design on this list uses a slightly different approach — the gold accents here are not just outlines but additional details within the flame forms: gold vein lines within each flame shape, small gold dot accents at the flame’s base, and potentially gold tip accents where the flame narrows to a point. The increased gold density gives this version a more elaborate, intricate quality than the outlined version.
Best for: Bold evening occasions, fashion events, nail appointments where the investment in detail is valued and appropriate.
How to recreate it: Follow the flame construction from design #22. Once the burgundy flames are dry, use a thin striping brush with gold polish to add internal detail lines within the flame shapes — curved lines that follow the flame’s organic form. Add small gold dots at the nail’s base where the flame begins. The additional gold details should feel integrated with the flame rather than separately imposed on it.
Nail shape: Almond and stiletto shapes are most harmonious with flame nail art.
29. Classic Glossy Burgundy Stiletto Nails
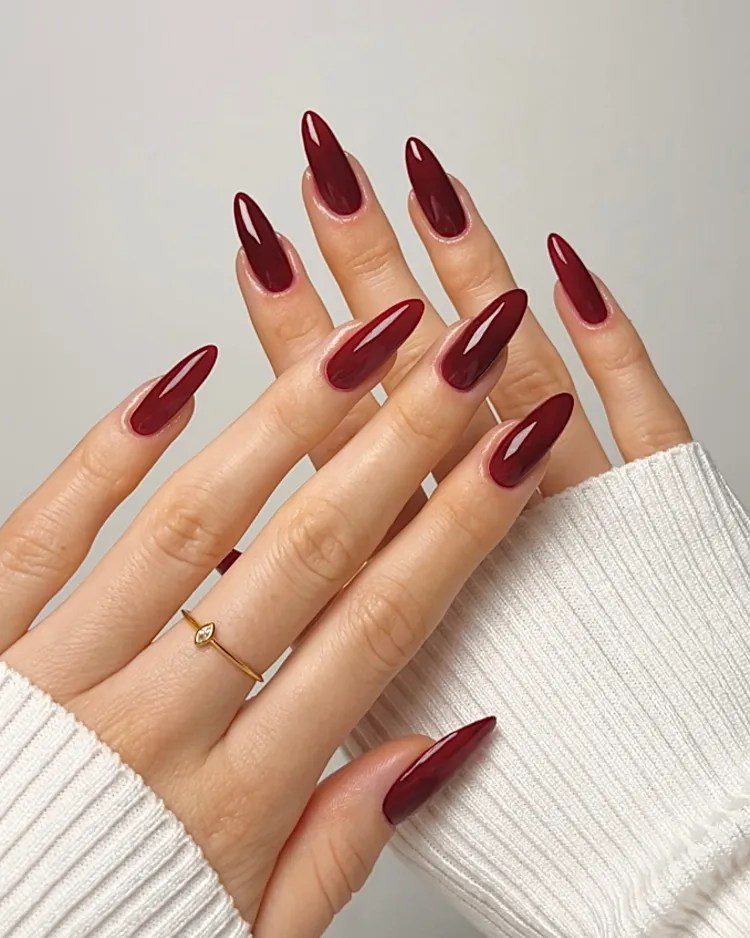
The stiletto nail’s sharp, dramatic point is the most commitment-intensive nail shape available — it’s unambiguously a fashion and beauty choice rather than a practical one. In a glossy, saturated burgundy, stiletto nails create a look that’s both classically glamorous and genuinely modern: the color references decades of sophisticated nail aesthetics; the shape is unmistakably contemporary.
Best for: Maximum fashion impact occasions, beauty events, occasions where bold personal expression is the primary goal.
How to recreate it: Stiletto nails require either acrylics or gel extensions for most nail lengths — achieving a true stiletto point on natural nails is only possible with significant natural nail length and expert filing technique. Apply rich burgundy gel in three thin coats on the stiletto extensions. A high-gloss no-wipe top coat produces the most deeply glossy, glass-like finish that stiletto nails are most beautifully known for.
Nail shape: Stiletto specifically. The shape is the entire statement.
30. Burgundy French Tips with Rhinestone Embellishments on Nude Base
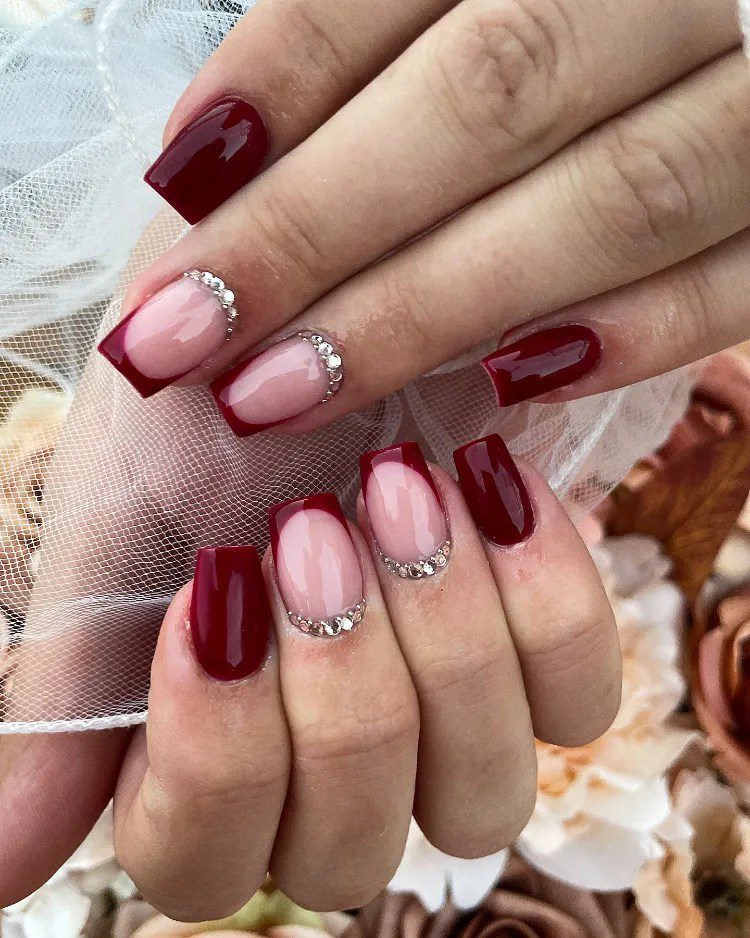
The rhinestone-embellished French tip is the most celebratory and most overtly glamorous design on this list — a design that takes the refined format of the French manicure and turns it into something that sparkles from across the room. Burgundy tips on a nude or sheer base, with small rhinestones placed along the tip line or scattered in a deliberate pattern across the base nail, creates a manicure that’s simultaneously classic in format and spectacular in effect.
Best for: Weddings, formal events, New Year’s Eve, any occasion where the highest level of nail glamour is appropriate.
How to recreate it: Apply a sheer or milky nude base. Create clean burgundy French tips using tip guides. While the tip is still slightly wet or using a gel-cured base, press small rhinestones along the tip line using an orange stick or wax pencil for precise placement. Vary rhinestone sizes for the most luxurious, dimensional effect — larger stones at the center of each tip, smaller ones at the edges. Apply a generous, thick top coat over all rhinestones to partially embed them and protect against loss.
Nail shape: Any shape carries rhinestone French tips beautifully. Almond and oval shapes give the design the most elegant, bridal quality. Coffin shapes give it a more modern, fashion-forward character.
How to Choose the Right Burgundy for Your Skin Tone
The shade of burgundy you choose is as important as the design. Within the broad category of “burgundy,” there are meaningful tonal variations that flatter different skin tones differently.
For fair skin: Choose burgundy shades with a slightly cooler, more purple-red bias — classic wine or merlot tones. These create the most striking, clean contrast against fair skin without reading as orange or muddy.
For medium or olive skin: True burgundy with balanced red and purple undertones is the most universally flattering across medium and olive skin tones. Slightly warmer burgundy (with more red) also works beautifully, creating a warm, harmonious relationship with the skin’s golden or olive undertones.
For deep skin: The richest, most saturated burgundies — almost oxblood or deep crimson-adjacent shades — look most spectacular on deep skin tones, where the depth of the color and the depth of the skin create a jewel-toned richness that lighter shades can’t achieve.
Pin it to find it later!
Final Thoughts
Burgundy nails earn their reputation as the most reliably sophisticated choice in the dark polish spectrum through a combination of qualities no other color quite replicates: versatility across occasions and seasons, flattery across skin tones, and a depth that rewards attention without demanding it. Whether you wear it as a solid, glossy statement or as the foundation of an elaborate embellished design, burgundy always reads as intentional — as though you chose it specifically, not accidentally.
Find the design from this list that speaks to your aesthetic and your upcoming occasion. Bring the reference to your nail tech or use the recreation guidance to try it at home. And then wear it with the confidence that burgundy — more than almost any other nail color — inherently communicates.
Save your favorites and bring the references to your next appointment — your nail tech will thank you for coming prepared.
Is burgundy suitable for every season or just fall?
Burgundy works in every season, though it reads differently depending on the context. In fall, it feels naturally resonant with the season’s palette. In winter, its depth feels rich and festive. In spring, paired with nude or blush accents, it becomes a sophisticated contrast color. In summer, a glossy, saturated burgundy reads as bold and confident rather than heavy. The finish, nail shape, and accent colors you choose can shift the seasonal feeling significantly.
Which burgundy nail design is the most low-maintenance?
The solid glossy coffin or almond nail (#23, #26) is the most low-maintenance because a high-quality solid gel color requires no special care beyond regular top coat reapplication and edge sealing. The alternating burgundy and nude design (#16) is a close second — no nail art to protect or maintain, just polish. Designs with rhinestones and 3D elements require more careful management to prevent element loss.
What nail shape shows burgundy polish best?
All nail shapes carry burgundy beautifully, but coffin and almond shapes are specifically recommended for their ability to show the full richness of the color across a maximally visible, flattering nail surface. Square shapes give burgundy a modern, graphic quality. Stiletto shapes make it dramatic and bold. Round and oval shapes are the most everyday-appropriate.
Can I wear burgundy nails to work?
Yes — burgundy is one of the most professionally appropriate nail colors available in the dark spectrum. A solid, clean glossy or matte burgundy reads as polished and deliberate in professional environments. More elaborate designs (3D florals, rhinestones, stiletto shapes) may require evaluation against your specific workplace aesthetic, but the color itself is universally office-appropriate.
What’s the difference between burgundy, wine, and oxblood nail polish?
These terms are often used interchangeably but describe slightly different positions in the dark red-purple spectrum. Burgundy has a balanced red-purple quality — neither too red nor too purple. Wine leans slightly cooler and more purple. Oxblood leans slightly warmer and more red-brown, with less purple in its composition. All three are within the same tonal family and are often mistaken for each other in practice, but the distinction matters when choosing a shade that flatters your specific skin tone.